Peanut Butter Chocolate Chip Spider Cookies Recipe
Peanut Butter Chocolate Chip Spider Cookies are soft, chewy, and decorated with peanut butter cups, chocolate legs, and candy eyes for a fun Halloween treat.
Servings: 24 cookies
Calories: 143kcal
Ingredients
- ½ cup salted butter at room temperature (1 stick)
- ¾ cup brown sugar
- ½ cup creamy peanut butter
- 1 large egg
- 2 teaspoons vanilla extract
- 1 ½ cups all-purpose flour
- 1 teaspoon baking soda
- ½ teaspoon salt
- ½ cup mini chocolate chips
Spider Decorations
- mini peanut butter cups
- Milk Duds
- mini candy eyes
- melted chocolate (or chocolate hazelnut spread)
Instructions
- Preheat the oven to 350℉ and line a baking sheet with parchment paper.
- In a bowl, beat the butter, brown sugar, and peanut butter until light and fluffy, about 2 minutes. Add the egg and vanilla and beat until creamy. Mix in the flour, baking soda, and salt until combined and fold in the chocolate chips.
- Scoop the dough into 1 tablespoon size balls and place on the prepared baking sheet about 2 inches apart.
- Bake for 8 to 10 minutes, or until the cookies are just beginning to set on the edges, but are still soft on the inside.
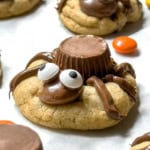
- Top each cookie immediately with an upside-down peanut butter cup and 1 milk dud for the head. Let cool on the baking sheet.
Spider Cookies
- Add melted chocolate (or hazelnut chocolate spread) into a resealable sandwich bag and snip off the corner. Draw 3 legs on either side of the peanut butter cup. Dot the candy eyes with chocolate and then place on the Milk Dud. Let the cookies set until the chocoltae is firm.
Notes
- Peanut Butter: Use creamy peanut butter for the smoothest texture. Chunky or natural peanut butter can be used, but the cookies may spread more or have a different texture.
- Chocolate Chips: Mini chips are best for bite-size Spider Cookies, but regular chocolate chips or chopped chunks will also work.
- Chilling the Dough: Not required, but if your dough feels soft or sticky, chill it for 20–30 minutes to help the cookies keep their shape.
- Decorating: Let cookies cool completely before attaching the peanut butter cup “body” and piping on the chocolate “legs.” Otherwise, the decorations may melt or slide.
- Make Ahead: Cookies can be baked and decorated up to 2 days in advance. Store them in an airtight container at room temperature.
- Freezing: Bake and cool cookies, then freeze undecorated for up to 2 months. Thaw before decorating with chocolate and candy eyes.
Nutrition
Calories: 143kcal | Carbohydrates: 17g | Protein: 3g | Fat: 8g | Saturated Fat: 4g | Polyunsaturated Fat: 1g | Monounsaturated Fat: 2g | Trans Fat: 0.2g | Cholesterol: 18mg | Sodium: 155mg | Potassium: 52mg | Fiber: 1g | Sugar: 10g | Vitamin A: 138IU | Vitamin C: 0.02mg | Calcium: 16mg | Iron: 1mg