
No Bake Chocolate Pie (3 Ingredients)
This post may contain affiliate links. Please read our disclosure policy.

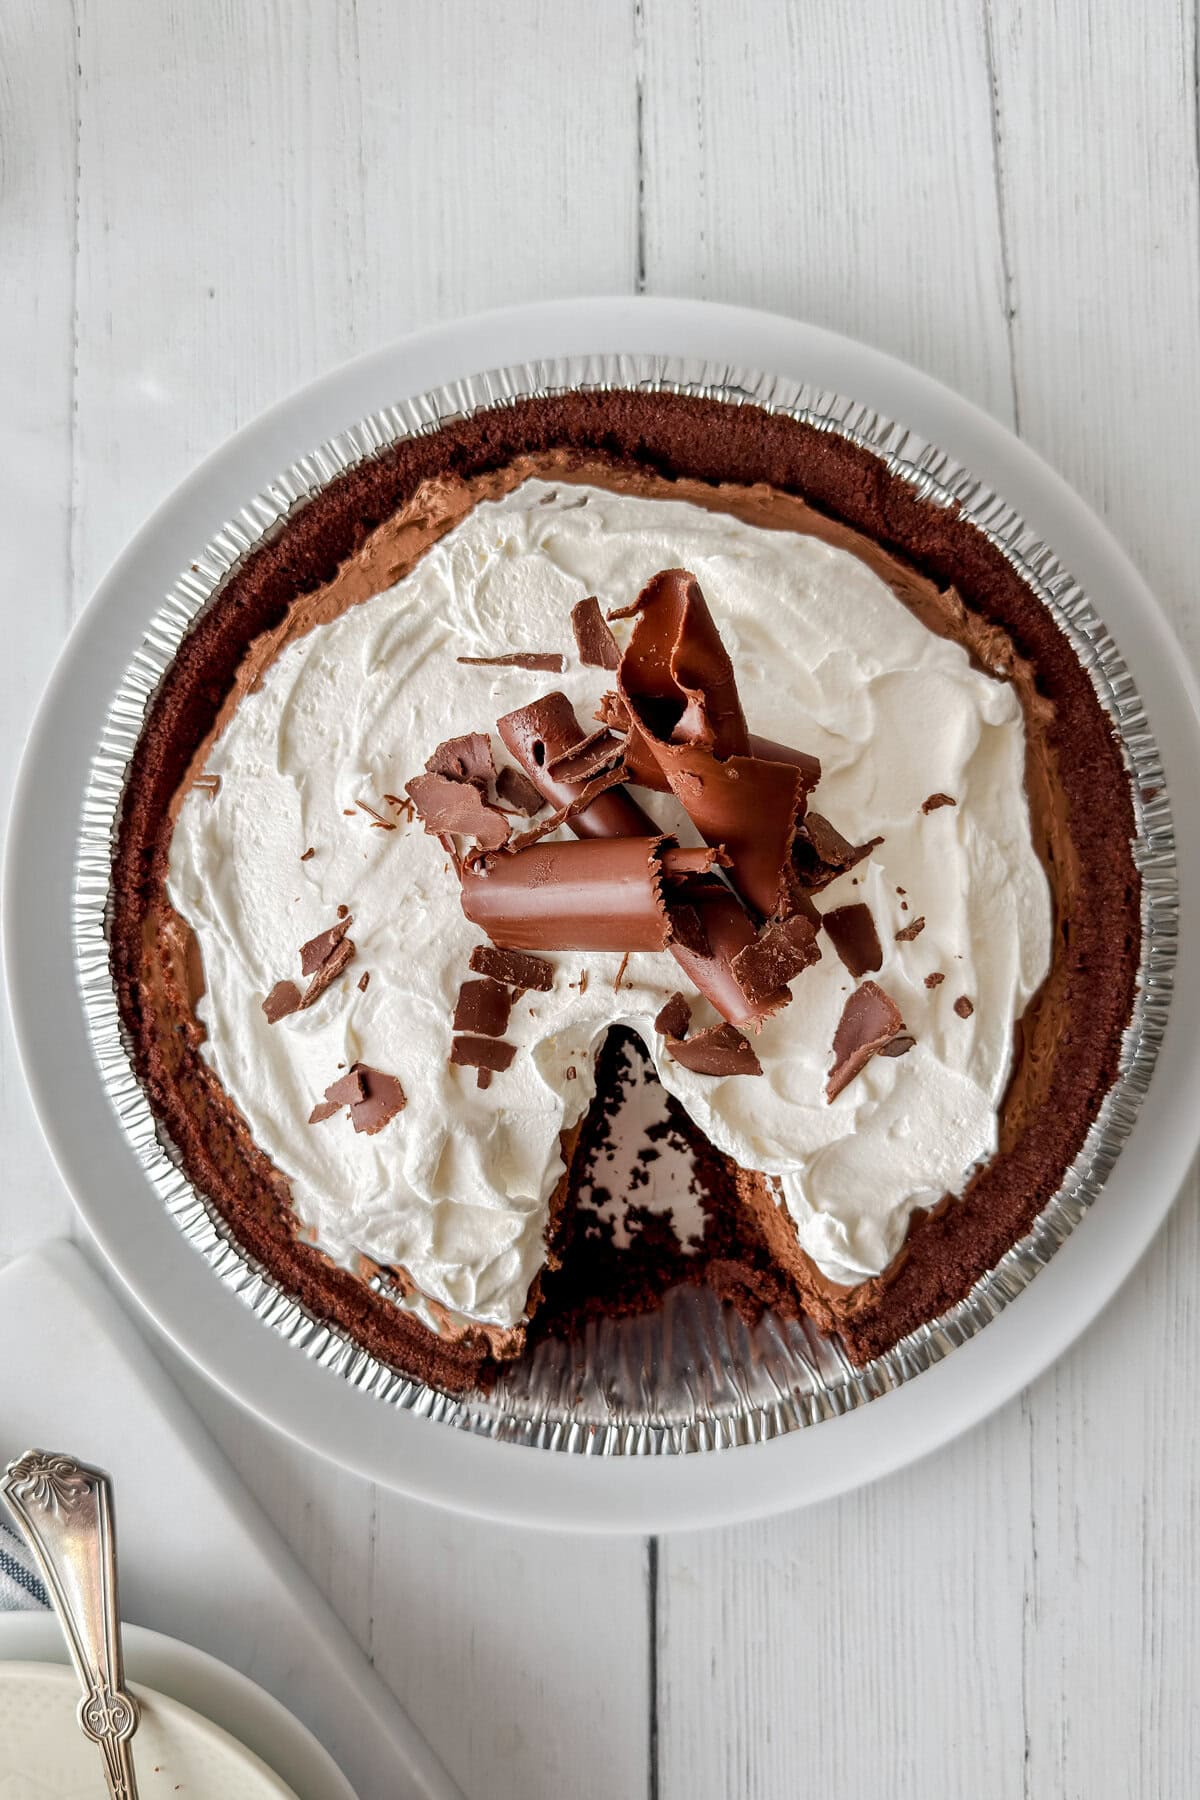
This easy 3-ingredient no-bake chocolate pie is as simple and delicious as it gets. Creamy, chocolaty, and seriously tasty. It takes mere minutes to make, plus chilling time. With rich chocolate flavor, a creamy mousse-like texture, and no oven required, it's a go-to dessert for warm days or last-minute cravings.
If you're looking for more no-bake desserts, try this reader favorite no bake cheesecake recipe (in 10 minutes) or this decadent no-bake peanut butter pie!

Want to save this recipe?
Enter your email, and we'll send it to your inbox. Plus, you'll get delicious new recipes from us every Friday!
Recipe Overview
Here's a quick look at what you'll need:
- Prep time: 10 minutes
- Chill time: 2 to 4 hours
- Servings: 8-10
- Tools needed: Microwave or stovetop, spatula, mixing bowl
- Recipe type: No-bake dessert, chocolate mousse pie
Jump to:
What I Love About This Recipe
- Only 3 ingredients: No extra steps, no hidden ingredients, just chocolate, whipped topping, and a crust.
- No-bake ease: Ideal for summer, busy holidays, or when the oven's already full.
- Make-ahead magic: Perfect for prepping the day before, and it slices beautifully once chilled.
- Crowd-pleaser: Creamy, chocolatey, nostalgic-this pie hits all the right notes for everyone at the table.
Behind the Recipe: An Accidental Favorite
This pie was a happy accident, one that first made its debut in our popular No Bake Peanut Butter Pie post. I had melted more chocolate than I needed (a rare but welcome mistake), and instead of tossing it, I decided to experiment.
With just two more ingredients, whipped topping and a cookie crust, I had a completely new dessert ready in minutes. Rich, creamy, and cool, it felt like chocolate mousse with half the effort.
It's been a favorite at our house ever since. One of those recipes that's almost too easy, but always welcome, especially when the chocolate cravings hit!
3 Ingredient Chocolate Pie
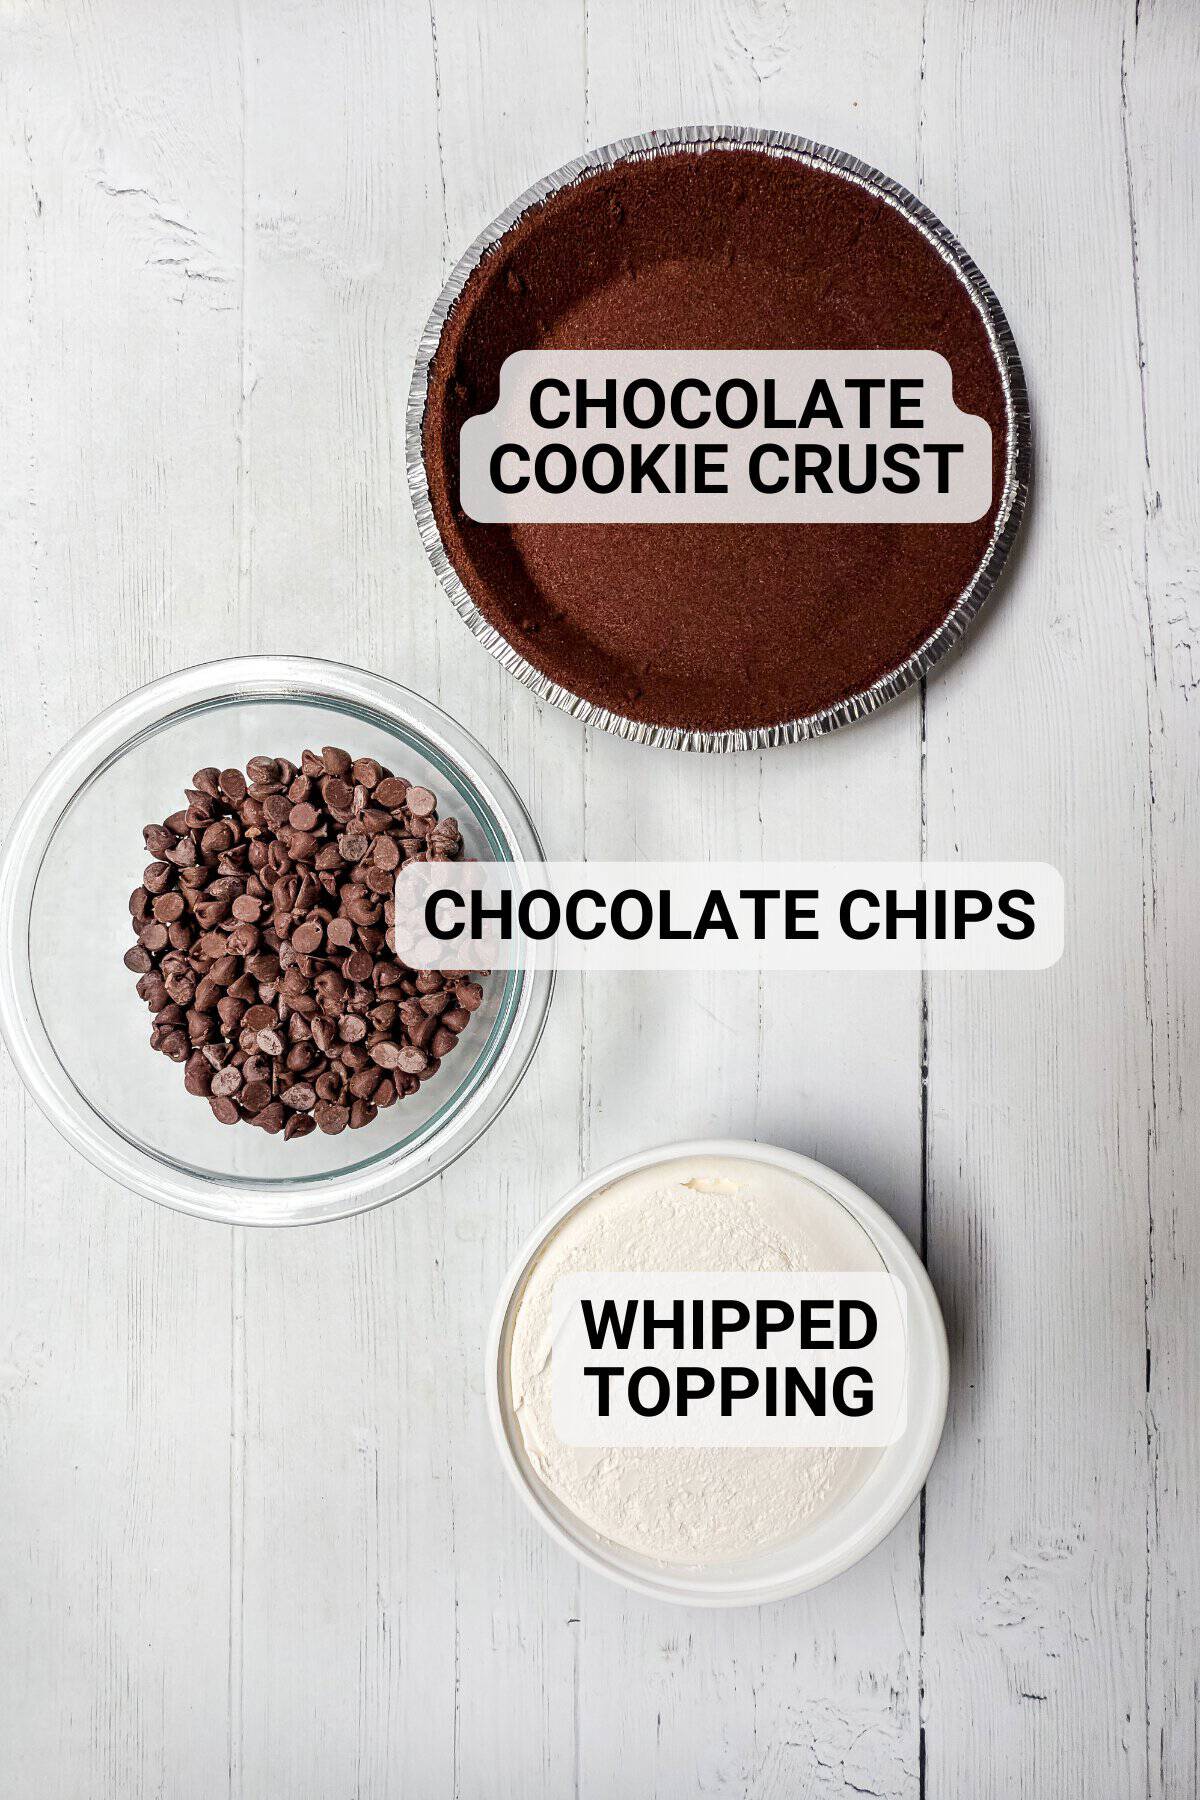
- Semi-Sweet Chocolate: I use chocolate chips, but chopped chocolate bars work too. Hershey's bars are classic, but any high-quality chocolate you love will work.
- Whipped Topping: Cool Whip makes this pie incredibly easy and stable, but you can also use homemade whipped cream if serving immediately.
- Pre-Made Crust: A chocolate cookie crust (like Oreo) adds a fudgy finish, while a graham cracker crust makes a lighter base. You can also make your own crust from scratch if preferred, as many have described in the comments below.
How to Make This No Bake Dessert
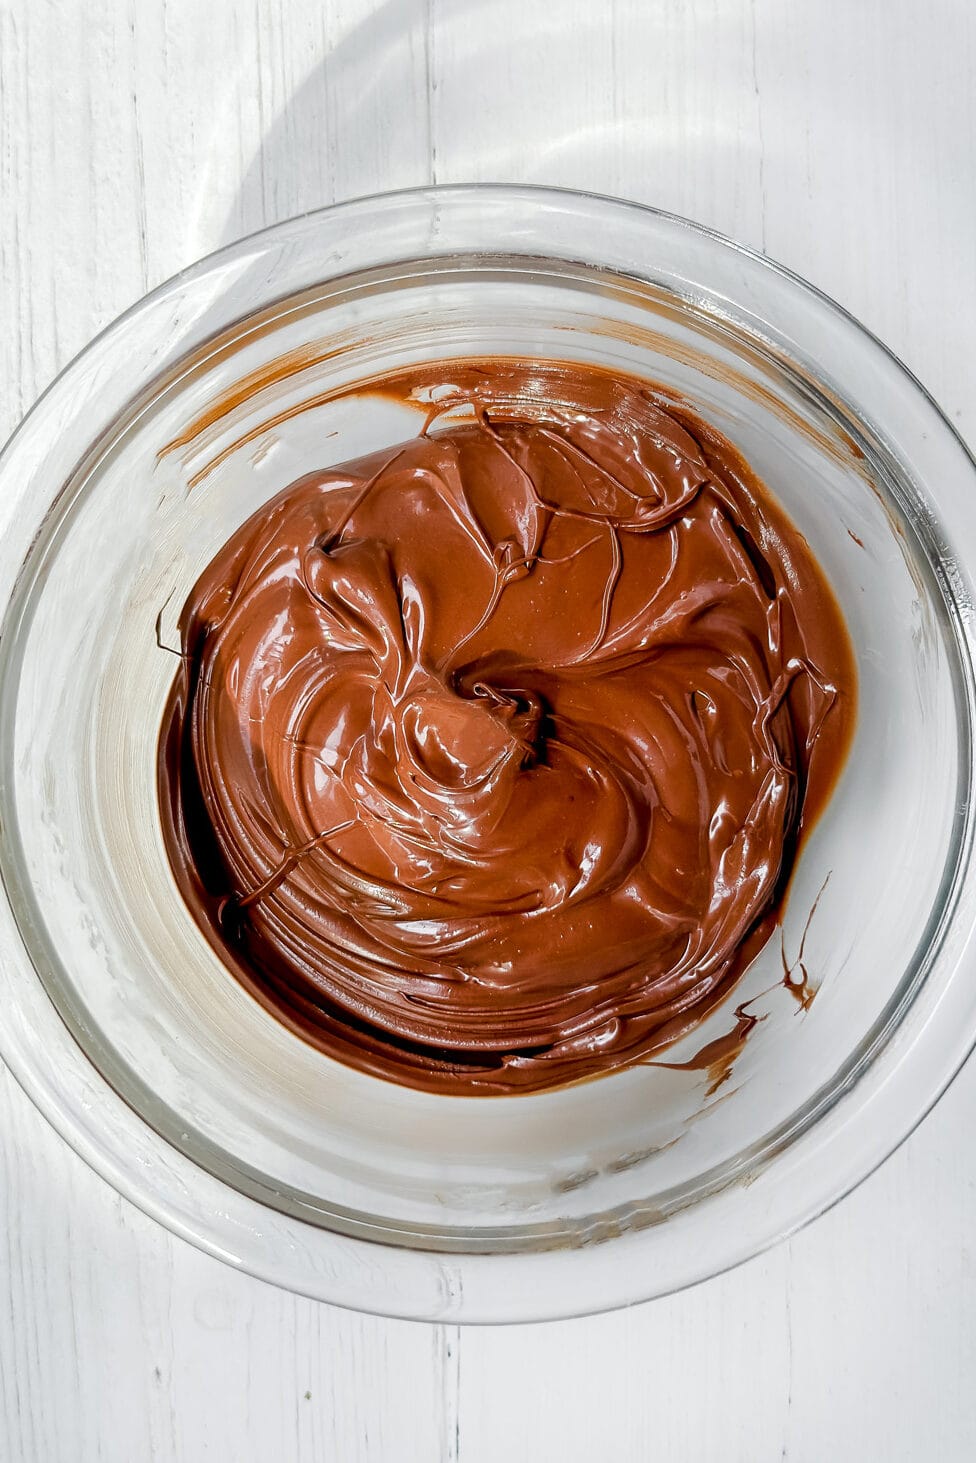
- Step 1: Melt the chocolate and let it cool. Place the chocolate in a microwave-safe bowl and melt according to package instructions. Typically, heat on high for 45 seconds and then at 10-12 second intervals, stirring until smooth and entirely melted. Let it cool to room temperature.

- Step 2: Fold in the whipped topping. Using a rubber spatula, gently fold the thawed whipped topping into the cooled chocolate until thoroughly combined. The mixture will be thick, smooth, and mousse-like. Keep stirring until no white streaks remain.
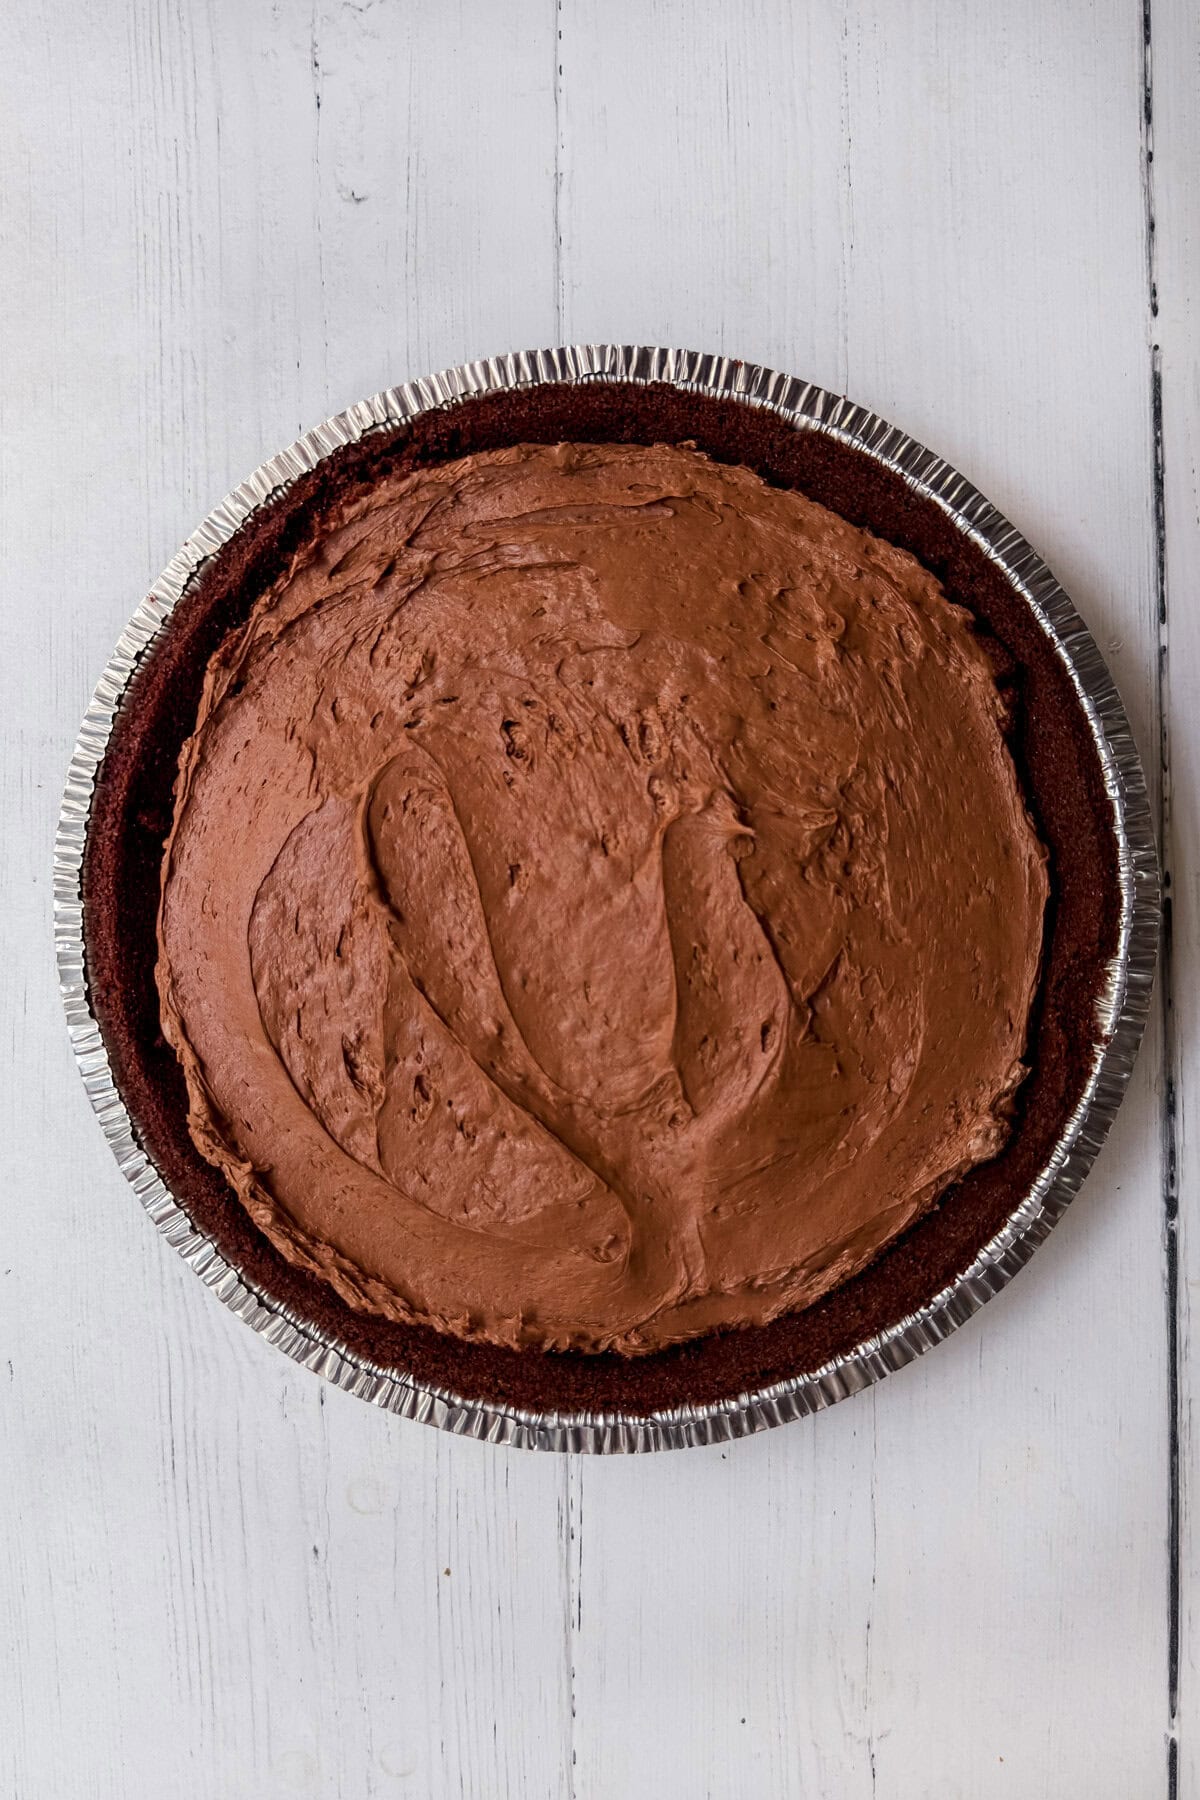
- Step 3: Fill the crust and chill
Spoon the chocolate mixture into the prepared cookie crust and smooth the top with a spatula or offset knife. Refrigerate or freeze the pie for 2 to 4 hours, or until it's firm enough to slice.
Optional Toppings
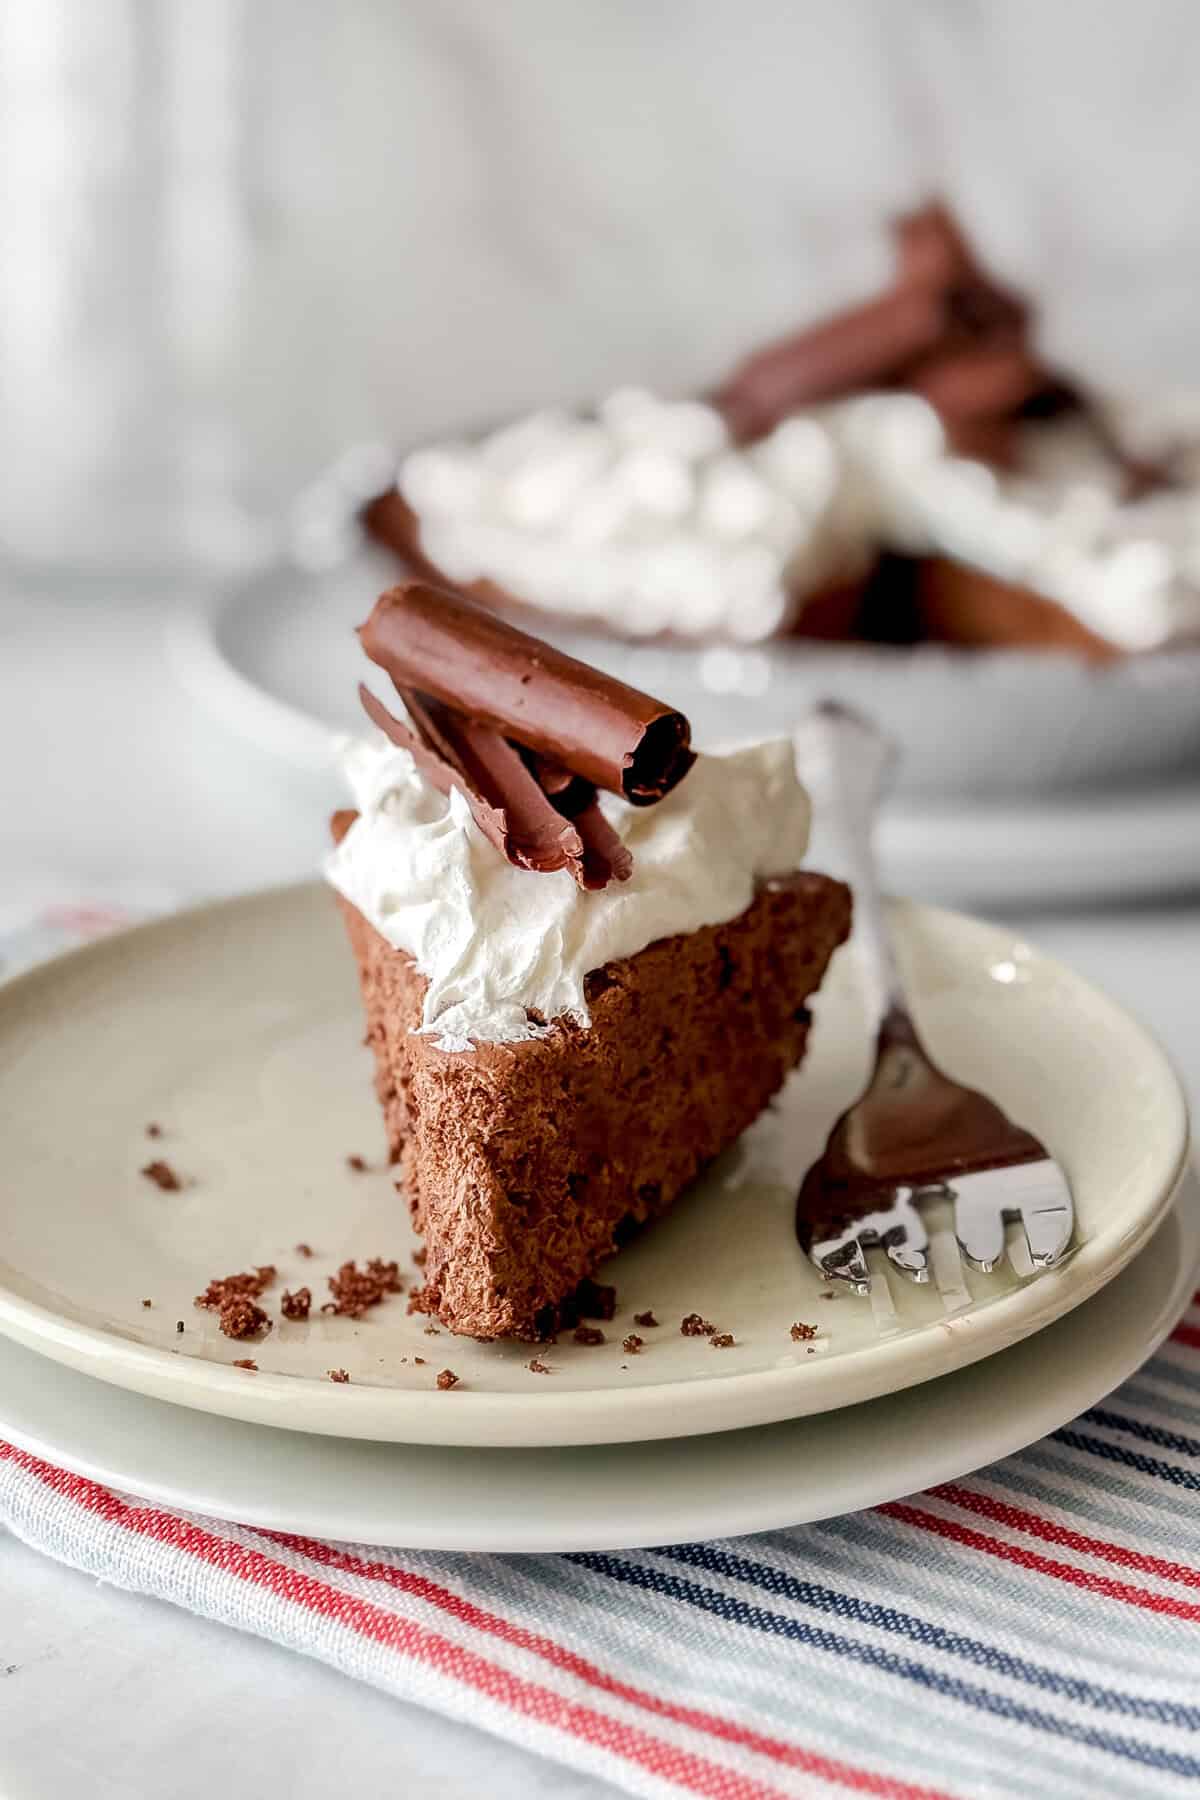
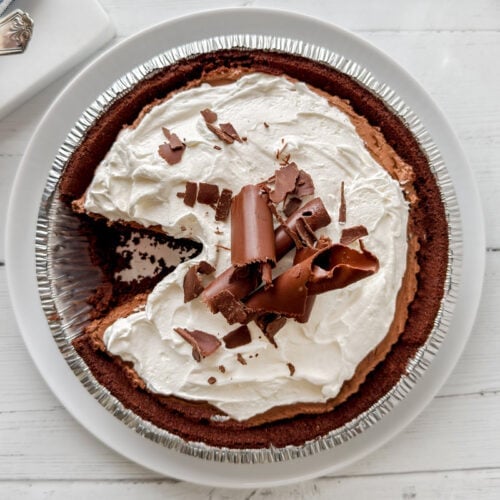
Before serving, you can top the pie with extra whipped topping and smooth it into a decorative layer. For an extra-special touch, garnish with chocolate curls, shavings, crushed cookies, or fresh berries. A dusting of cocoa powder or a drizzle of chocolate sauce is also delicious.
Variations & Tips
- Chocolate Choices: Semi-sweet chocolate chips or bars are classic, but you can also use bittersweet chocolate for a richer flavor or milk chocolate for a sweeter pie. Just avoid unsweetened baking chocolate.
- Crust Options: An Oreo crust gives the pie a fudgy finish, while a graham cracker crust makes it a little lighter. You can also make your own cookie crust using chocolate wafers or digestive biscuits.
- Cool Whip vs. Whipped Cream: Store-bought whipped topping helps the pie hold its shape and last longer in the fridge. Homemade whipped cream works too, just serve the pie the same day, as it will soften more quickly.
- Mini Pies or Ramekins: Spoon the filling into mini tart shells, ramekins, or even jars for a fun twist on individual mousse pies.
- Garnish Ideas: Dress it up with chocolate curls, a sprinkle of cocoa powder, whipped cream, crushed cookies, or fresh berries.
Recipe FAQs
Yes, you can! Homemade whipped cream works well, but it's softer and less stable than store-bought whipped topping. If using fresh whipped cream, it's best to serve the pie the same day for the best texture.
Semi-sweet chocolate chips or chopped chocolate bars work best. You can also use bittersweet or milk chocolate, depending on your sweetness preference, but avoid unsweetened baking chocolate. Hershey bars are a nostalgic favorite for this recipe.
Yes, you can freeze this pie when using prepared whipped topping, though it may slightly alter the texture of the filling, for up to 1 month. Thaw in the refrigerator overnight and decorate with additional whipped cream and toppings just before serving.
It's similar! This no-bake pie has a mousse-like texture thanks to the whipped topping, but it's much simpler than a traditional mousse. It's often called a shortcut or easy chocolate mousse pie.
Chill the pie in the refrigerator for 2 to 4 hours, or until firm enough to slice cleanly. You can also place it in the freezer if you're short on time.
Definitely, it's a great make-ahead dessert. Prepare it the night before and store it in the refrigerator until ready to serve. Add garnishes just before serving for the freshest look.
More Easy No Bake Desserts:
- Strawberry No Bake Mini Cheesecakes
- No Bake Chocolate Peanut Butter Bars
- No Bake Icebox Cake with Summer Berries
- Easy No-Bake S'mores Icebox Cake
- No-Bake Peanut Butter Pie


If you try this recipe, I'd love to hear your comments and consider giving it a 5-star rating. Explore the recipe index for more easy, delicious ideas, and stay updated by subscribing to our newsletter and following us on Facebook, Pinterest, Instagram, and YouTube!
No Bake Chocolate Pie
Ingredients
- 1 (9-inch) store-bought cookie crust graham or chocolate
- 10 ounces chocolate melted
- 10 ounces whipped topping plus more for garnish
Instructions
- Begin by melting the chocolate in either a double boiler on the stovetop or in the microwave according to package instructions. If you melt it in the microwave, typically melt for 45 seconds and then at 10 second intervals, stirring between until creamy and smooth. Let cool until room temperature, about 10 minutes or so.
- Once the chocolate is cooled, with a rubber spatula, mix the chocolate with the thawed whipped topping until incorporated. Stir until there are no white streaks from the whipped cream visible. Transfer into the cookie crust and smooth with the spatula.
- Top the pie with the more whipped topping if desired and smooth with an offset spatula. Chill or freeze for 2 to 4 hours or until firm.
- Before serving, using a vegetable peeler or with a knife, chop or curl pieces of chocolate to decorate the top.
Video
Notes
- Chocolate Choices: Semi-sweet chocolate chips or bars are classic, but you can also use bittersweet chocolate for a richer flavor or milk chocolate for a sweeter pie. Just avoid unsweetened baking chocolate.
- Crust Options: An Oreo crust gives the pie a fudgy finish, while a graham cracker crust makes it a little lighter. You can also make your own cookie crust using chocolate wafers or digestive biscuits.
- Cool Whip vs. Whipped Cream: Store-bought whipped topping helps the pie hold its shape and last longer in the fridge. Homemade whipped cream works too-just serve the pie the same day, as it will soften more quickly.
- Mini Pies or Ramekins: Spoon the filling into mini tart shells, ramekins, or even jars for a fun twist on individual mousse pies.
- Garnish Ideas: Dress it up with chocolate curls, a sprinkle of cocoa powder, whipped cream, crushed cookies, or fresh berries.
Nutritional information is only an estimate. The accuracy of the nutritional information for any recipe on this site is not guaranteed.
Easiest way to make chocolate pie! An alternate filling is 1 Cup heavy cream heated in a large saucepan until hot but not bubbling or boiling. Turn off heat and add 12 ounces of chocolate chips (any flavor will work). Stir until smooth. Pour into pie crust. Refrigerate for two hours or more. Slice and serve.
I'm so glad you enjoyed it! And thank you for sharing an cooked alternate filling-- it's also delicious!!
For our Thanksgiving dessert I made this with dairy free dark chocolate chips and a cool whip with no preservatives and it came out so delicious! I couldn’t find a pre made Oreo pie crust so I made my own with 22 cookies that I first scraped out the creme filling and pulsed in food processor and added a stick of butter. This chocolate pie was so easy to make.
Hi Judy! I'm so happy you were able to adapt this recipe and loved it! And... thank you for sharing the way you made the Oreo crust (which is SO much better than ready made). Thank you for trying the recipe!
We also had the issue with the discrepancy between the cooler temp of the cool whip and the warmer chocolate. The cool whip had fully thawed, but was chilled. The chocolate solidified, but not in hard bits. It was more like the chocolate ribbons you find in icecream. So while it wasn’t the texture we expected, it was still delicious. We called it chocolate ribbon pie, and it was a huge hit. Thanks!
So are u supposed to bake the crust before assembling? Doesn't say in the recipe but someone posted u should.
Hi Jessica. It isn’t necessary to pre bake a graham or Oreo ready-made crust. However, baking it for a few minutes can freshen up the crust and enhance its flavor. It definitely should be prebaked and cooled entirely before making the pie though.
Oops I didn’t let my cool whip thaw all the way… so it just immediately hardened my chocolate once I added it! Made it more like a chunky chocolate cool whip. Still tasted good but weird texture lol
Hi Hilary! Thank you so much for sharing your thoughts. You are right, the cool should be completely thawed. I'm make a better note of that in the recipe card.
Hi i am going to make this for youth camp (100
People 😳). Can i make this a couple of weeks ahead and freeze it so I have this made and ready?
Oh my word! I’m laughing because that used to be my life- youth camps all summer. It should be fine. I have frozen it for up to a month with no issues (but not 100 😍). Have fun this summer— would love to hear how it turns out!
Hi i am going to make this for youth camp (100
People 😳). Can i make this a couple of weeks ahead and freeze it so I have this made and ready?
Hi Lisa, you can definitely do that! Have fun (summer youth camps used to be my life too).
this is so so good! I made my own crust using homemade chocolate sugar cookies and the filling is like a chocolate mousse. I used Bravo crem whipped topping.
can I freeze the pie?
Hi Jessica, yes, you can freeze this pie.
Remember to bake the pie crust!!! That was my bad, I didn't read the pie crust instructions :'(
Oh no - Deanna! I'm so sorry! I can't tell you how many times I've done that with other pies.
Hi, this looks delicious and so easy! One question though, dark chocolate or milk chocolate?
Thank you
Hi Linda! It is SO easy — use your favorite chocolate. I used semi sweet in the photos but dark chocolate is wonderful!
Love the way it easy to make the non bake yumlicouis pie so good I'm in heaven😗😍
Can I used regular whipped cream instead of Cool Whip?
Hi Ray! I have not tested this recipe using heavy cream. Cool Whip contains stabilizers that will make the pie more sturdy. However, in theory, heavy cream that is whipped should work.
I would whip to stiff peaks 1 cup of heavy cream with 3 tablespoons of confectioners sugar and 1 teaspoon of vanilla extract for flavor. Then gently fold in the melted chocolate. If you try it... I would love to hear the results!
Hi Ray — as you probably know, Cool Whip contains stabilizers that keep the topping fluffy. Homemade whipped cream doesn’t have that and deflates pretty quickly. I’ve not tried this recipe using my own whipped cream. Here is an article though on substituting freshly whipped cream https://www.tasteofhome.com/article/whipped-topping-substitute/.
I’d love to know if you try it — how it worked out!