
Homemade Whole Wheat Bread
This post may contain affiliate links. Please read our disclosure policy.

This 100% whole wheat bread is soft, flavorful, and naturally sweetened with honey. Made with simple ingredients and a stand mixer (or by hand), it's perfect for toast, sandwiches, or warm slices straight from the oven. It's my go-to homemade bread-and a longtime reader favorite.
See my single loaf whole wheat bread recipe if you want to make just one, or if you're new to breadmaking, refer to my Bread Making Guide for answers to common FAQs.

Want to save this recipe?
Enter your email, and we'll send it to your inbox. Plus, you'll get delicious new recipes from us every Friday!
Recipe Overview
- Makes: 2 Loaves (See Whole Wheat Bread Single Loaf Recipe for one)
- Time: Prep, 25 min; Rising, 2 hrs; Bake, 30 min; Total, about 2 hrs
- Tools: Stand mixer (or by hand), 2 loaf pans
Featured Review:
One reader shared their success in the comments below:
"I made this bread exactly as written and it turned out perfect. I kneaded for quite a while to bring out the gluten and the results are a light, very tasty bread. Thank You for your recipe!"
What I Love About Homemade Whole Wheat Bread
- Reader-tested and loved for over a decade!
- Uses simple, real ingredients you likely already have on hand
- Produces two soft, golden loaves with a tender crumb
- Easily adaptable with tips for honey, molasses, or sugar
And, it's especially when you pair it with an easy, small-batch Refrigerated Strawberry Jam.
If you enjoy making homemade bread, be sure also to check out our new recipe for Homemade Soft Pretzels, which is another fun dough to work with.
Jump to:

100% Whole Wheat Bread Ingredients
Gather these ingredients to make this superb, utterly delicious homemade bread.
- Whole wheat flour: you can also use white whole wheat is you prefer the taste
- Instant yeast (although active dry yeast works too)
- Honey for sweetness (or maple syrup if preferred)
- Cooking oil
- Salt
How to Make Whole Wheat Bread from Scratch
This bread dough is incredibly easy to make. With few ingredients, it comes together quickly. The time involved is mostly inactive as it will rise twice.

Step 1: Add warm water and honey to a large bowl or the bowl of your stand mixer. Sprinkle the yeast over the top and let it sit for 5 minutes. If you're using instant yeast, add it with the flour and skip the 5-minute proofing time.

Step 2: Add 4 cups of flour, oil, and salt to the yeast mixture; stir until incorporated. Then add the remaining flour, ½ cup at a time, until the dough pulls away from the bowl's sides.
Knead the dough and use the windowpane test to determine if your dough has developed sufficient gluten. Hold a piece of dough between your fingers and very gently pull and stretch the dough. If the dough stretches enough without tearing to see light through it, it's ready!

Step 4: Transfer the dough to an oil-coated bowl, cover it, and let it rise until doubled, about 1 hour. Punch the dough down, cover, and let rise another 30 minutes.

Step 5: Divide the dough in half and form 2 loaves. I like to make a log and tightly pinch the seam and the ends.
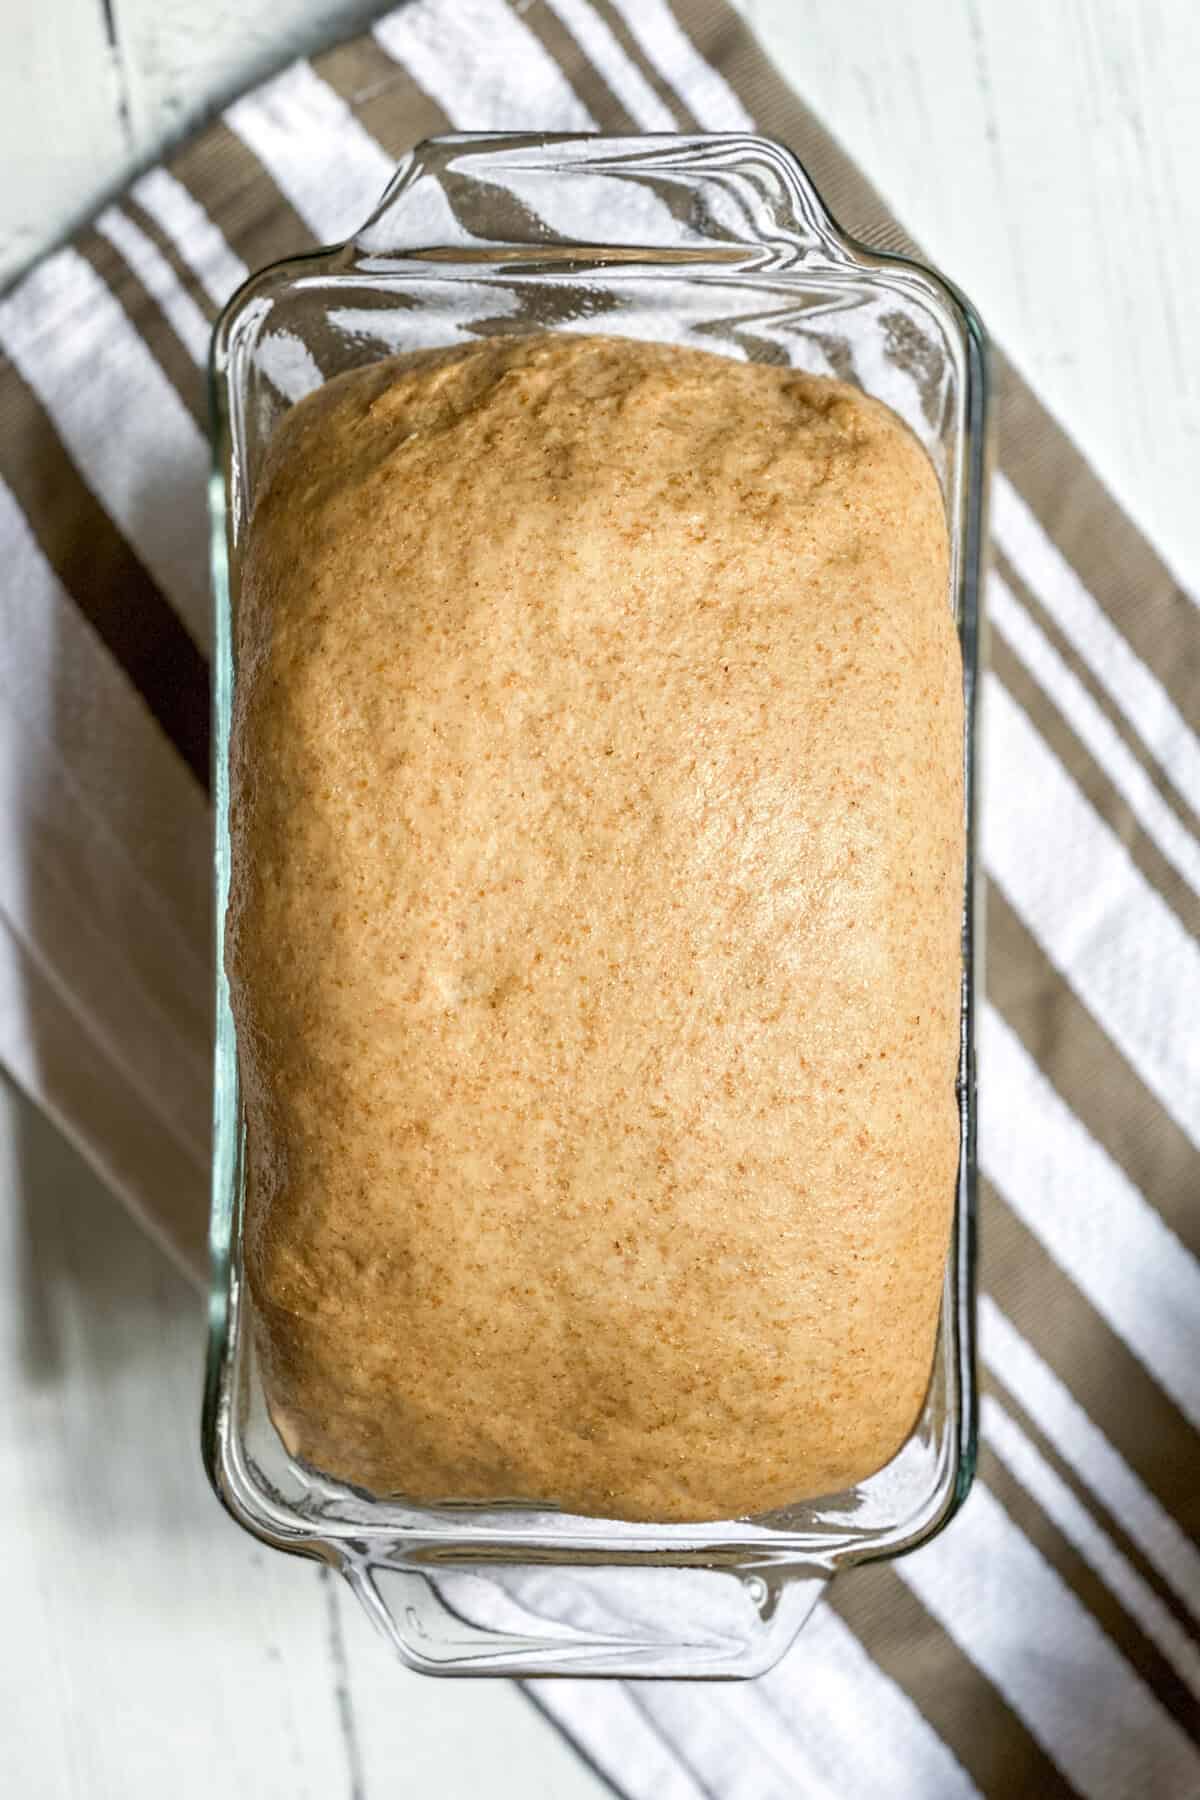
Step 6: Transfer to two 9 x 5-inch, well-greased loaf pans with the seam side down. Cover loosely with greased plastic wrap and rise warmly until the center has crowned, about 1 inch above the loaf rim, about 30 minutes.
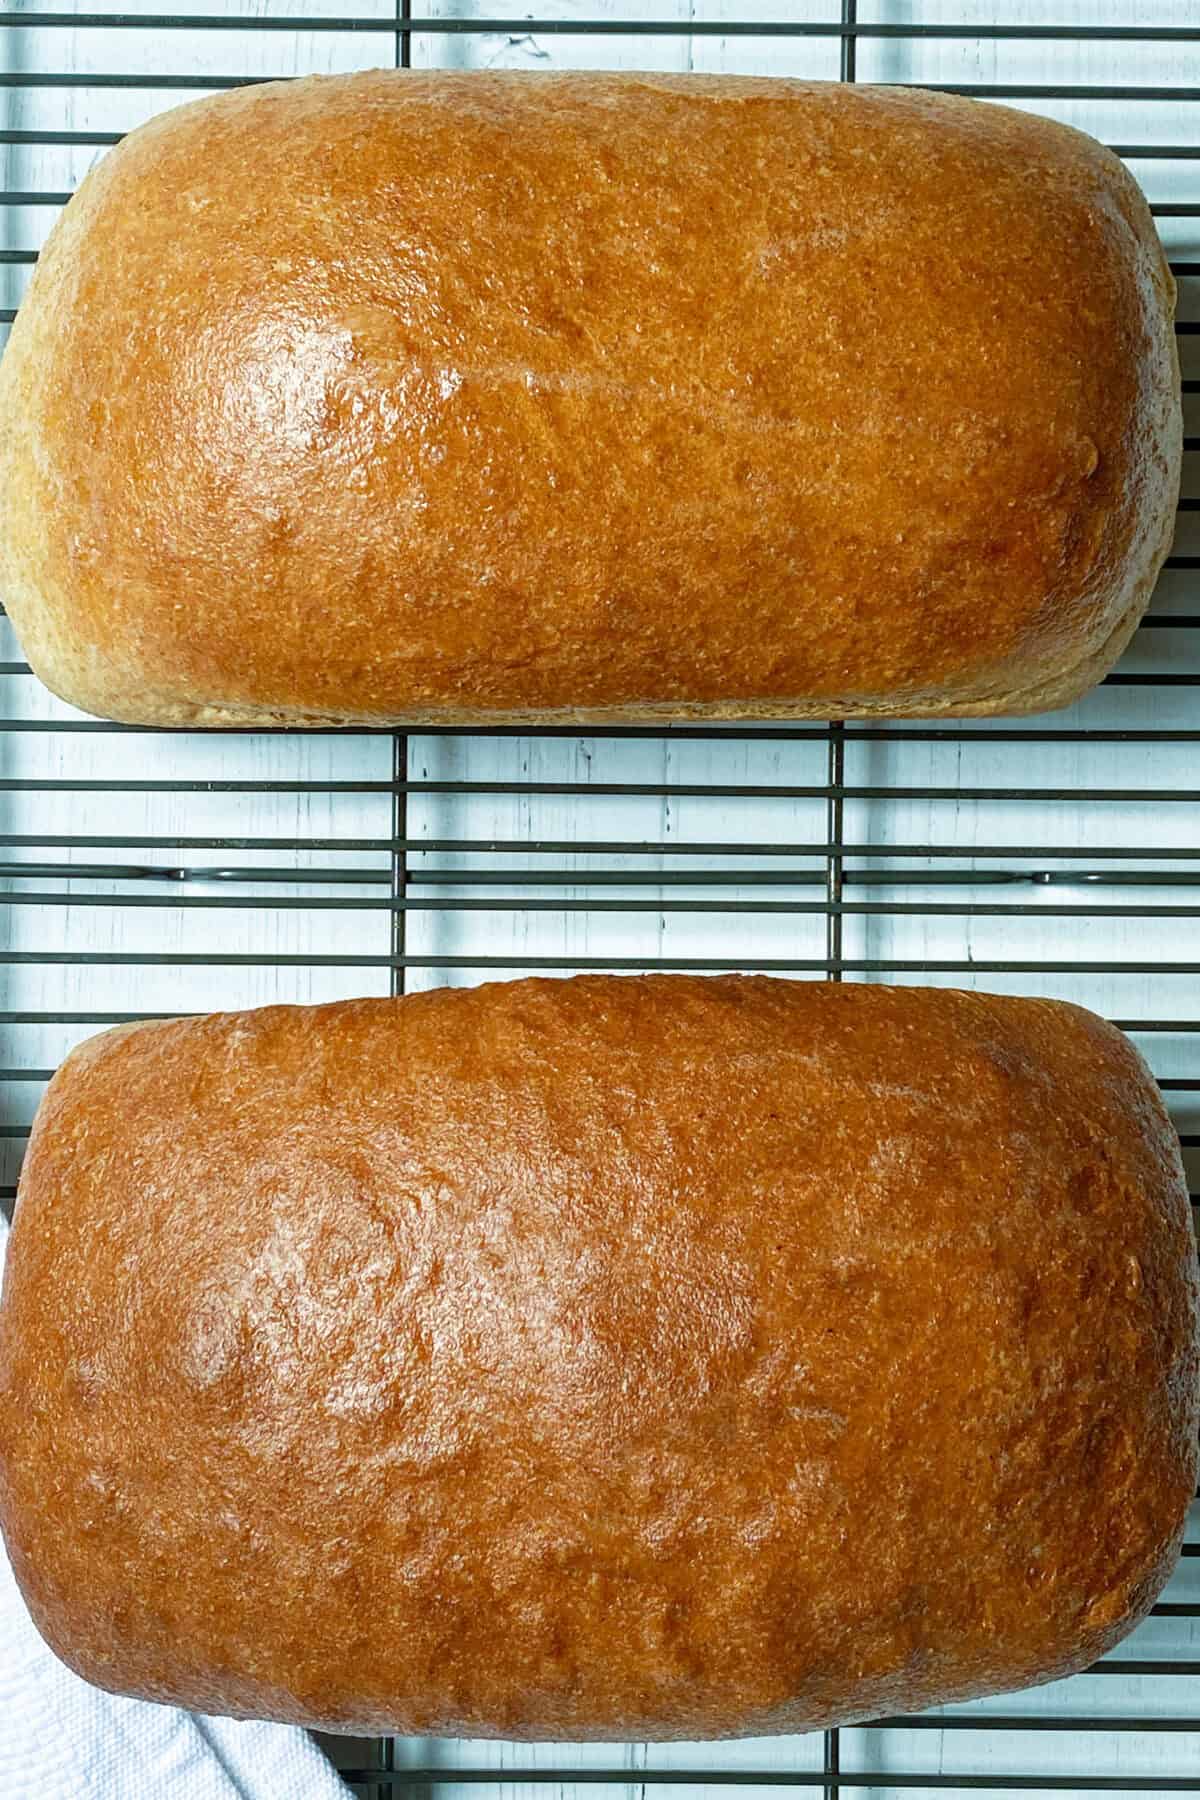
Step 7: While the bread is rising, preheat the oven to 350°F. Bake for 30 minutes, or until a digital thermometer reads 180°F to 200°F.
Immediately remove the loaves and bread pans from the oven and let them cool completely on a rack before slicing.

Recipe FAQs
Over the years, I've received so many thoughtful questions from readers who've baked and loved this homemade whole wheat bread. Whether you're looking for ingredient substitutions, want to bake it in a Dutch oven, or need help troubleshooting texture or rising, you'll find helpful answers below. These tips are based on my own experience and feedback from bakers just like you!
Recipe Adjustments & Substitutions
Yes, ground flaxseed meal can be added to this recipe without adjusting the amount of flour. However, since flax absorbs moisture, you may need to add a little extra liquid to keep the dough soft and easy to knead.
Absolutely. You can substitute granulated sugar for honey using the same amount. The overall flavor will be slightly different, but the bread will still bake beautifully.
Yes, molasses is an excellent substitute for honey in this recipe. It adds a deeper color and a more robust, earthy flavor. Many readers have made this swap with excellent results.
Oat flour can be used in combination with whole wheat flour, but it shouldn't be used as a full replacement since it lacks gluten. For best results, substitute no more than ¼ to ⅓ of the flour with oat flour, and be prepared to slightly adjust the moisture level to get the right dough texture.
Baking Process & Troubleshooting
Yes, this bread can be baked in a Dutch oven with excellent results, similar to my Quick No Knead Rosemary Bread. Preheat your oven to 450°F with the Dutch oven inside. Once the dough is ready, place it in the hot Dutch oven and bake for 10 minutes with the lid on. Then reduce the oven temperature to 375°F and bake for an additional 20 minutes, still with the lid on. Finally, remove the lid and bake for another 8 minutes to allow the crust to brown.
This recipe includes three rise periods. First, the dough rises for about 1 hour, or until doubled in size. After deflating the dough, it rests for a second rise of about 30 minutes. Finally, once the dough is shaped and placed in pans, it rises a third time for 30 to 60 minutes, depending on the temperature of your kitchen.
Problems with rising are often caused by environmental factors like humidity, temperature, or flour moisture levels. The dough should be soft and slightly tacky but still easy to knead. If it's too dry or stiff, the bread may not rise well. Add flour gradually, and adjust water if needed to get a supple dough texture. Don't be afraid to trust the feel of the dough.
Ingredient Information
Both are 100% whole wheat flours, but they come from different types of wheat. Traditional whole wheat flour is milled from red wheat, giving it a darker color and heartier flavor. White whole wheat flour is milled from white spring wheat, which results in a lighter color and a milder, slightly sweeter flavor.
You can use regular whole wheat flour, white whole wheat flour, bread flour, or stone-ground whole wheat flour. Each variety brings its own texture and flavor. Personally, I prefer stone-ground whole wheat for its nutty, slightly rustic character, but any of these options will produce a delicious loaf.
More Bread Recipes You'll Love


If you try this recipe, I'd love to hear your comments and consider giving it a 5-star rating. Explore the recipe index for more easy, delicious ideas, and stay updated by subscribing to our newsletter and following us on Facebook, Pinterest, Instagram, and YouTube!

Whole Wheat Bread Recipe
Equipment
- 2 9 x 5 inch Loaf Pans
Ingredients
- 5 ½ to 6 cups whole wheat flour
- 2 ½ cups warm water
- 1 ½ tablespoons instant yeast or 2 packages active dry yeast
- ¼ cup honey
- 2 tablespoons oil
- 1 tablespoon salt
Instructions
- In a large bowl or the bowl of your stand mixer, add warm water and honey. Sprinkle the active dry yeast over the top and let sit for 5 minutes. If using instant yeast, add it with the flour and skip the 5 minute proofing timenm.
- Add 4 cups of flour, oil, and salt to the yeast mixture; stir until incorporated. Then add the remaining flour, ½ cup at a time, until the dough begins to pull away from the sides of the bowl.
Knead the dough
- If kneading by hand, transfer the bread dough to a very lightly floured surface, oil your hands, and knead for 6 to 7 minutes or until the dough is smooth. If kneading in a stand mixer, using the dough hook, knead for 4 minutes at medium speed until the dough is smooth. Adjust the dough as needed with additional flour or water if necessary.
- Transfer the dough to an oil-coated bowl and let rise in a warm place for about 1 hour, until the dough has doubled. Punch the dough down, cover, and let rise for 30 minutes.
Shape the loaves
- Coat two loaf pans (8.5 x 4.5 inches or 9 x 5 inches) and set them aside. Divide the dough in half and form it into 2 loaves. I like to make a log and then tightly pinch the seam and the ends. Place seam side down in prepared pans, cover loosely, and let rise in a warm place until the center of the loaf has crowned, about 1-inch above the loaf rim-about 30 to 60 minutes.
Baking
- Meanwhile, preheat the oven to 350 degrees F.
- Uncover the loaves and place them in the oven. Bake for 35 to 40 minutes or until a digital thermometer reaches between 180° - 200°F. Tent a sheet of foil over the loaves after 20 minutes to prevent over-browning if desired.
- Remove the bread from the oven and from the loaf pans. Transfer to a rack to cool completely before slicing. Brush melted butter over the warm bread for a delicious crust as it cools.
Video

Notes
- Whole Wheat Flour: Regular whole wheat, whole wheat bread flour, white whole wheat flour all work great. I always use Stone Ground Whole Wheat Flour. Adjust the flour amount as necessary so that it pulls away from the bowl and is easily handled.
- Storing: Wrap bread and store it at room temperature for several days or freeze it for longer storage.
- Mixing the dough: This recipe is written for a stand mixer but can be made by hand. Knead until the dough is smooth, elastic, and slightly tacky.
- Dough rising: Rise times may vary depending on your kitchen temperature. Warmer environments will shorten rise times; cooler temperatures may lengthen them.
- Serving ideas: Delicious with butter and jam (like this easy strawberry jam recipe), sliced for sandwiches, or toasted for breakfast.
Nutritional information is only an estimate. The accuracy of the nutritional information for any recipe on this site is not guaranteed.
I used this recipe and it is AMAZING !! I’m always trying to bake fresh homemade bread and have had many failures. This is a KEEPER. I have 2 beautiful loaves and I thank you !!
This makes me so happy! I have a couple of loaves in the oven right now, it's such a treat to have homemade bread on hand. Thank you for letting me know how you liked it!
I made it and it was awesome
Thank you for trying the recipe, Christine!
I made the recipe with coarse ground whole wheat. It was so delicious! I would make it again!!
I love coarse ground whole wheat, it gives so much textured flavor to the loaf. Thank you for trying it and letting me know how it worked for you.
What can I use instead of butter or margarine to brush on the top of the bread since neither one of them I can eat.
Hi Deb, for a healthier or dairy-free alternative to butter, brush the loaf with olive oil or avocado oil immediately after baking. This adds shine and softens the crust. If you would like a slightly sweet alternative, honey will do the same.
A simple and basic recipe. The instructons are very clear and easy to follow and the results are awesome! My go to for homemade bread.
Hi Laura! Thank you for trying the whole wheat bread recipe and making it your "go-to!" It's mine too. I'm so happy you enjoy it!
Hi just trying to figure out why my loaf still seems like it’s doughy in the middle. I can’t seem to figure out why it turned out like this. It’s also my first time making bread. And advice would be great.
Hi Briana -- Welcome to bread making! It can be so frustrating when the middle is doughy, but this is the most common first-time issue.
You likely ran into one of these three simple problems:
1. Slicing too soon, this is the #1 culprit! Bread finishes cooking (setting) as it cools. You must let the loaf cool completely on a wire rack—typically 1 to 2 hours—before slicing. Slicing it hot traps moisture and makes it gummy.
2. Not Baked Long Enough: The outside might look done, but the inside needs more time. Your oven may be running cooler than it says. Next time, let it bake a little longer or until the crust is a deep golden brown. If you have an instant-read thermometer, the center should hit aroundd 190-200 degrees F.
3. Too Much Moisture: Double-check your measurements, especially flour. If your dough felt a little too sticky before baking, a slight adjustment to the flour next time will help. It's a delicate balancing between flour and moisture. Look for cues in the dough after kneading like, "Is it sticky or tacky?" You want the bread tacky instead of sticky. Adding additional flour (about 1 tablespoons at a time) can help with that issue.
Thank you so much for reaching out and for trying the recipe!
So you rise one hr.. punch down rise another 30 mins then put in pans for another hr? Then bake
Hi Monique— yes, but the exact times will vary slightly depending on how warm the kitchen is. It could take up to 90 minutes (1 1/2 hrs) to double during the first rise. On the last rise, after the bread is shaped and rising in the pans, it could also take a bit longer, again depending on the warmth of the kitchen. When I’m baking these loaves in the summer, rise times are shorter than in the cooler months.
Can I use beef tallow in place of oil ? I’m trying to reduce the carbs wanted to know. Also almond flour be used ?
Having a hell of a time getting it to stay one inch above the bread pan. When it's baking it falls even with the pan. It's still good but small loaves.
I'm using whole wheat fine grind+high protein in fifty Pound bag made by gold medal .. what am I doing wrong, open with any suggestions, thank you
Hi Joe!
I’m so glad you’re enjoying the bread, even if the rise is giving you a challenge! Whole wheat can be a little stubborn because the bran in the flour can weigh the dough down. A few things to try: make sure your yeast is fresh and active, give the dough a bit of extra kneading to fully develop the gluten-- the windowpane test is a great indicator, and let it proof until it’s truly about 1/2 to 1-inch above the pan — even if that takes longer than the recipe suggests. You could also try swapping in a little bread flour (it has a higher gluten content) or adding a splash of warm water to help it along if the dough is dry. And remember — even a shorter loaf is still homemade, wholesome, and delicious! 😊
I love your recipe for whole wheat bread! I was so happy that my children eat it! Even the crusts! I do add 1/2 c ground flaxseed for the omega 3s and it still turns out great. I also reduce honey/sugar to 2 T. So pleased with the recipe!!!
I’m laughing about the crusts because I can completely relate! I had a no crust kid until I started him on whole wheat bread. I love your adaptations and so thrilled your children loved it! Thank you for sharing and trying the bread ❤️.
Great recipe! Can I make it in a Dutch oven?
Hi Doris-- That is a great question and I can't believe I haven't tested that yet. In theory, most bread recipes can be baked in a Dutch oven, providing a beautiful environment for a soft and tender loaf. I will test this soon!
Bread looks wonderful. I’d like to add some ground flaxseed meal.Would i decrease the amount of flour by the same amount?
Hi Gail! Thank you so much. Adding ground seeds is a great idea! You generally do not need to adjust the flour. Some seeds have a higher moisture absorbency and may require added liquid instead when making the dough. Flaxseeds is one of the seeds that most often require a bit more liquid. I’d love to hear how it works if you try it!
Hi Doris, I wanted to update your question. I have tried and tested the recipe in a Dutch oven. It works great! After the second rise, I scored the top of the domed bread with an "x". I also preheated the oven to 450F with the Dutch oven inside. I then baked the bread for 10 minutes (lid on) and then reduced the oven to 375F and baked for another 20 minutes. I then removed the lid and in my oven, baked for another 8 minutes to further brown and crisp the bread.
Hi, thank u for ur recipy but pls can i use granulated sugar inplace of honey
Hi Julia — yes can definitely use granulated sugar in place of the honey.
I have just started learning to bake. This recipe is an absolute hit in my house. I follow the recipe exact each time I make it. The proofing times may go a bit longer due my memory 😇.
I have a question, how do i make one loaf a cinnamon and raisin bread. I tried to separate the loaves, roll one out add cinnamon and raisins with sugar but it was not what I thought it should be. Wasn't sweet enough. Should I just make a single recipe adding more honey or??.... 😁 Thank you for your time.
Chris
Hi Chris! I’m so happy you are enjoying the whole wheat bread recipe! SO— I have had a cinnamon and raisin bread recipe on my post list for more than a year! Every time I get ready to final test, something comes up and it moves down the list. You’ve inspired me to get that recipe finished soon!
Can I make this pita ??
Can I use oat flour with the wheat flour?
This was the very first time I made bread ever! Recipe was very easy to follow. For this being my first time I'm quite impressed with how it turned out! It didn't rise above the pan like it said it was supposed. So not sure what I did wrong there. Its a bit flat and kinda floury. Any tips to avoid that? Otherwise it tastes good!
Hi Sierra, I'm SO glad you tried this recipe. Bread making is easy, and I promise that it gets easier every time you do it. Keep at it. Rising and flour to moisture ratios vary depending on the weather, how humid it is in your kitchen, it's temperature, etc. Dough made in a warm kitchen will rise more quickly. If it's humid, flour can act like a sponge. When making your whole wheat dough, it should feel soft and a little tacky, but still able to knead with floured hands. Adjust the flour and water very, very slighly as you're making the dough until it feels like this.
hi Stephanie,
I am not someone who enjoys bread making. I dread the texture of kneading than kneading itself. the slimy to sticky inconsistency due to temperature and recipe differences. I tried to followed yours and I'm still at the 2nd proofing stage now. but I only used 4 and a half cup to create the dough. it is changed from dried to proper dough with minimal sticking. I knead by hand so I gave a good 8 minutes knead by hand before proofing. is 4 and a half cup sufficient for 2 loaves? I am using 9 by 5 inch loaf tins. I wish I had proper bread tins but I am working with what I have. I worry my dough is insufficient to create 2 loaves of 9 by 5 inches bread. please advise? much appreciated.
** 4 and a half cup of whole wheat flour. apologies for not clarifying.
Hi Max! I don’t think 4.5 cups of flour will make enough dough to fill two 9x5 inch bread pans. I do have a recipe for a single loaf that uses only a little more than 3 cups. That recipe would give you the ingredient ratios needed. https://www.31daily.com/whole-wheat-bread-single-loaf/. I hope your bread turned out ok!!
This was my first time making this recipe And I followed suggestions to use molasses in place of honey as well as I made sure to knead the dough for a longer time that you usually would.
Hi Isabella! I'm so happy you tried the recipe and the hints and tips helped you in making the recipe. I love adding molasses in place of honey too!
I made this bread exactly as written and it turned out perfect. I kneaded for quite awhile to bring out the gluten and the results are a light , very tasty bread. Thank You for your recipe!
So glad you enjoyed it, Rick! Thank you for trying it and letting me know how it worked for you!