
Homemade Whole Wheat Bread
This post may contain affiliate links. Please read our disclosure policy.

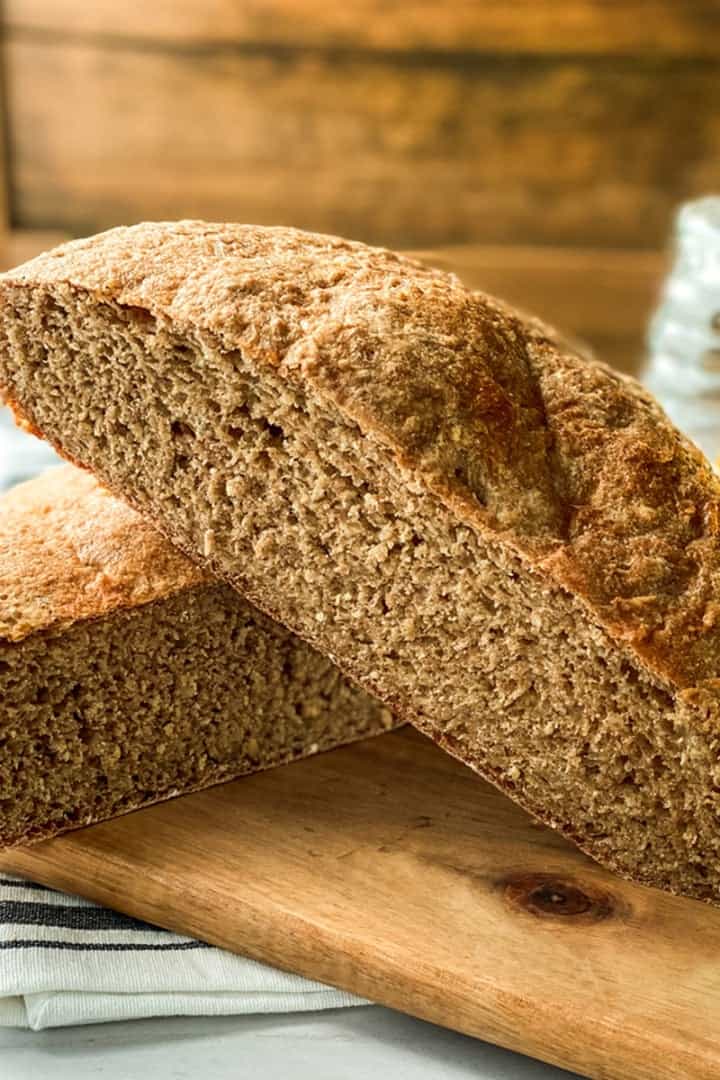
This 100% whole wheat bread is soft, flavorful, and naturally sweetened with honey. Made with simple ingredients and a stand mixer (or by hand), it's perfect for toast, sandwiches, or warm slices straight from the oven. It's my go-to homemade bread-and a longtime reader favorite.
See my single loaf whole wheat bread recipe if you want to make just one, or if you're new to breadmaking, refer to my Bread Making Guide for answers to common FAQs.

Recipe Overview
- Makes: 2 Loaves (See Whole Wheat Bread Single Loaf Recipe for one)
- Time: Prep, 25 min; Rising, 2 hrs; Bake, 30 min; Total, about 2 hrs
- Tools: Stand mixer (or by hand), 2 loaf pans
Featured Review:
One reader shared their success in the comments below:
"I made this bread exactly as written and it turned out perfect. I kneaded for quite a while to bring out the gluten and the results are a light, very tasty bread. Thank You for your recipe!"
What I Love About Homemade Whole Wheat Bread
- Reader-tested and loved for over a decade!
- Uses simple, real ingredients you likely already have on hand
- Produces two soft, golden loaves with a tender crumb
- Easily adaptable with tips for honey, molasses, or sugar
And, it's especially when you pair it with an easy, small-batch Refrigerated Strawberry Jam.
If you enjoy making homemade bread, be sure also to check out our new recipe for Homemade Soft Pretzels, which is another fun dough to work with.
Jump to:

100% Whole Wheat Bread Ingredients
Gather these ingredients to make this superb, utterly delicious homemade bread.
- Whole wheat flour: you can also use white whole wheat is you prefer the taste
- Instant yeast (although active dry yeast works too)
- Honey for sweetness (or maple syrup if preferred)
- Cooking oil
- Salt
How to Make Whole Wheat Bread from Scratch
This bread dough is incredibly easy to make. With few ingredients, it comes together quickly. The time involved is mostly inactive as it will rise twice.

Step 1: Add warm water and honey to a large bowl or the bowl of your stand mixer. Sprinkle the yeast over the top and let it sit for 5 minutes. If you're using instant yeast, add it with the flour and skip the 5-minute proofing time.

Step 2: Add 4 cups of flour, oil, and salt to the yeast mixture; stir until incorporated. Then add the remaining flour, ½ cup at a time, until the dough pulls away from the bowl's sides.
Knead the dough and use the windowpane test to determine if your dough has developed sufficient gluten. Hold a piece of dough between your fingers and very gently pull and stretch the dough. If the dough stretches enough without tearing to see light through it, it's ready!

Step 4: Transfer the dough to an oil-coated bowl, cover it, and let it rise until doubled, about 1 hour. Punch the dough down, cover, and let rise another 30 minutes.

Step 5: Divide the dough in half and form 2 loaves. I like to make a log and tightly pinch the seam and the ends.
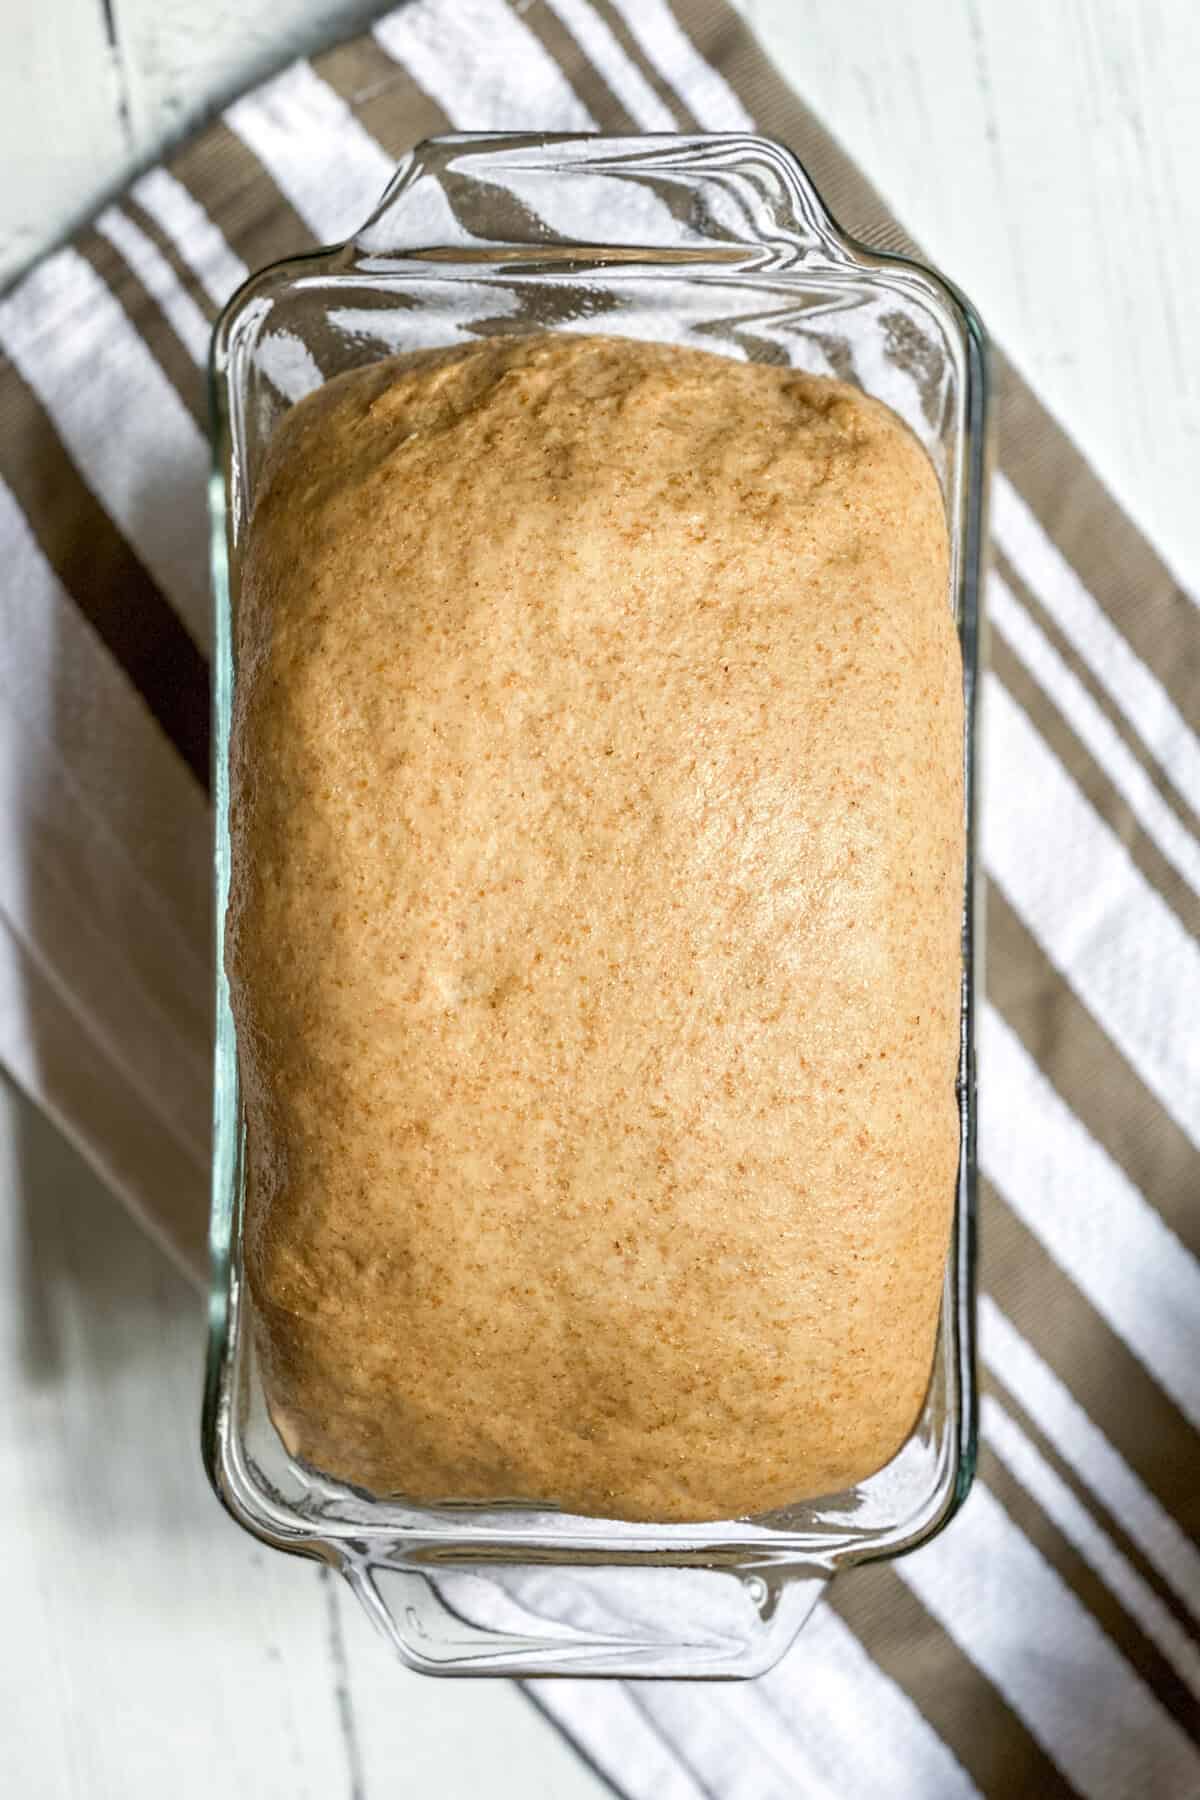
Step 6: Transfer to two 9 x 5-inch, well-greased loaf pans with the seam side down. Cover loosely with greased plastic wrap and rise warmly until the center has crowned, about 1 inch above the loaf rim, about 30 minutes.
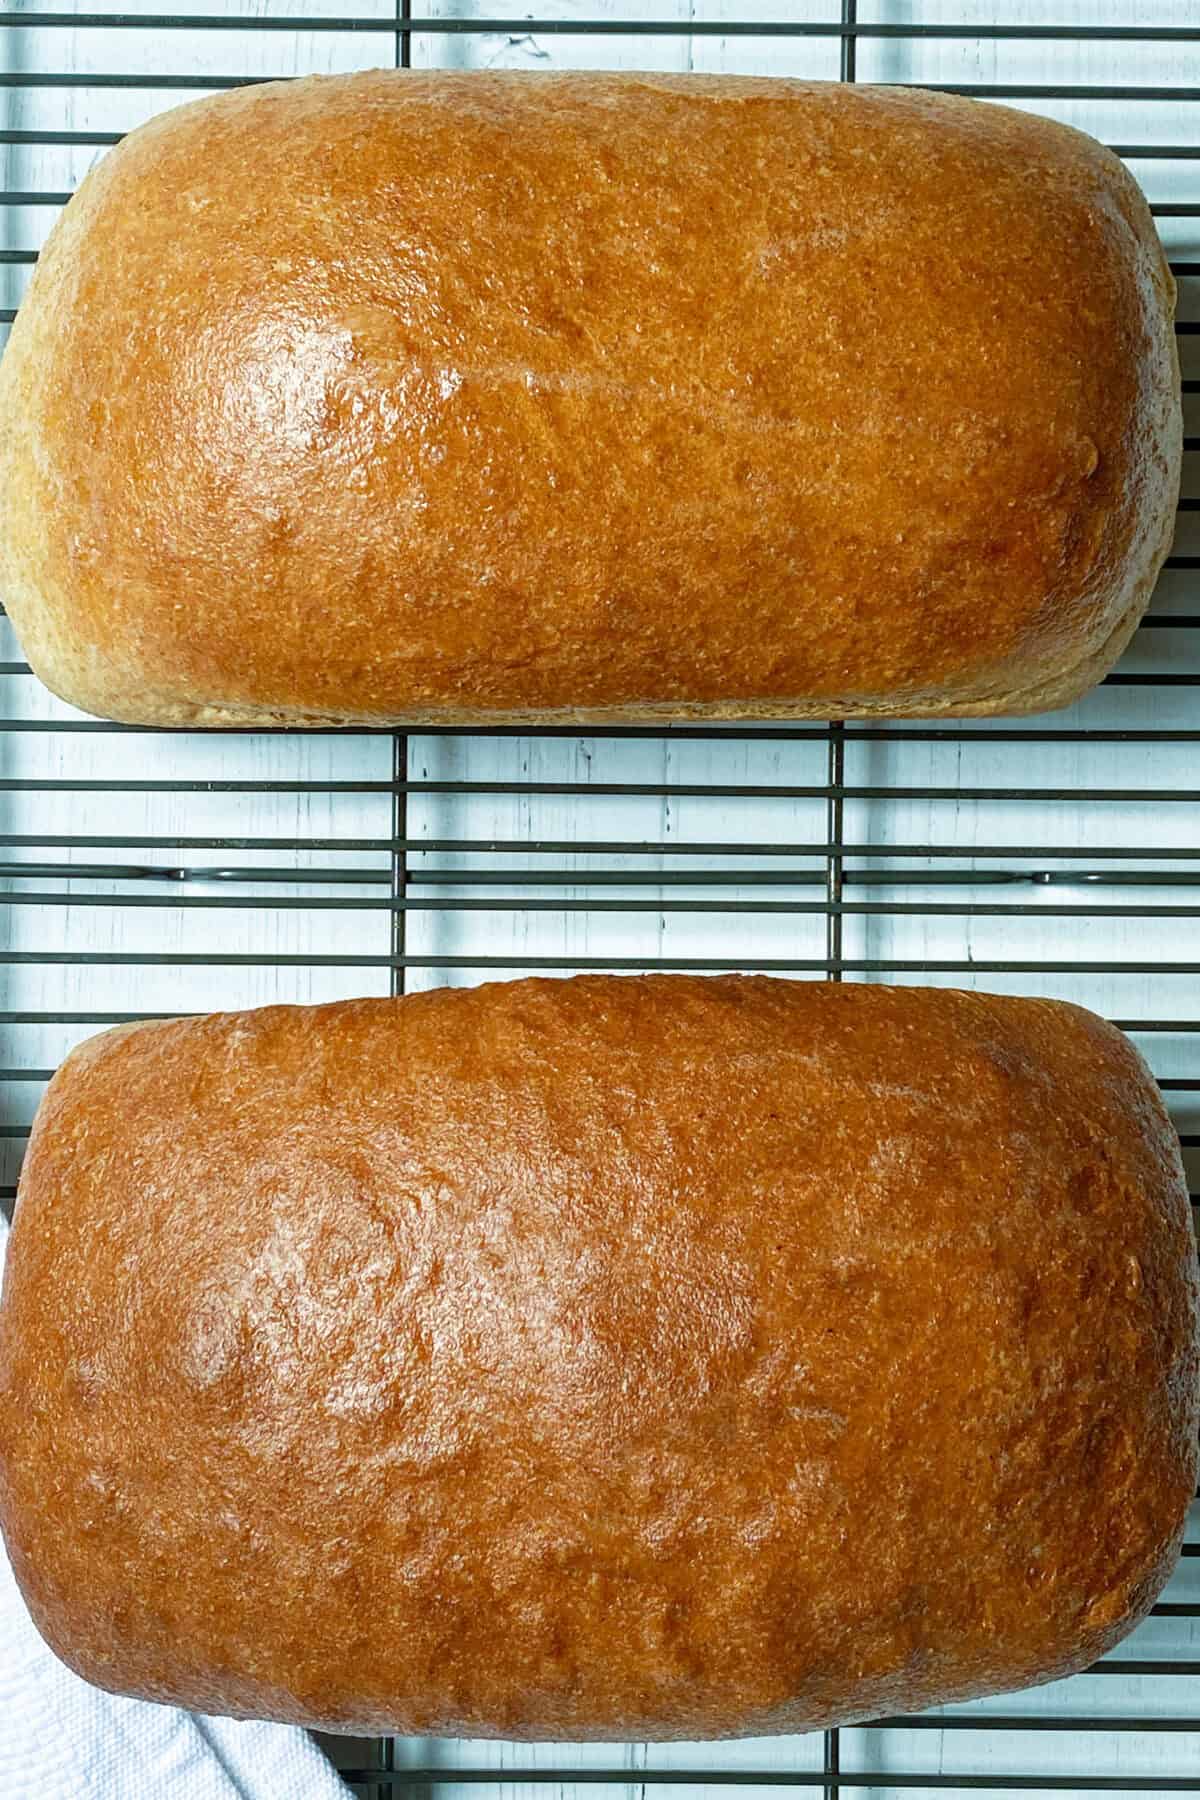
Step 7: While the bread is rising, preheat the oven to 350°F. Bake for 30 minutes, or until a digital thermometer reads 180°F to 200°F.
Immediately remove the loaves and bread pans from the oven and let them cool completely on a rack before slicing.

Recipe FAQs
Over the years, I've received so many thoughtful questions from readers who've baked and loved this homemade whole wheat bread. Whether you're looking for ingredient substitutions, want to bake it in a Dutch oven, or need help troubleshooting texture or rising, you'll find helpful answers below. These tips are based on my own experience and feedback from bakers just like you!
Recipe Adjustments & Substitutions
Yes, ground flaxseed meal can be added to this recipe without adjusting the amount of flour. However, since flax absorbs moisture, you may need to add a little extra liquid to keep the dough soft and easy to knead.
Absolutely. You can substitute granulated sugar for honey using the same amount. The overall flavor will be slightly different, but the bread will still bake beautifully.
Yes, molasses is an excellent substitute for honey in this recipe. It adds a deeper color and a more robust, earthy flavor. Many readers have made this swap with excellent results.
Oat flour can be used in combination with whole wheat flour, but it shouldn't be used as a full replacement since it lacks gluten. For best results, substitute no more than ¼ to ⅓ of the flour with oat flour, and be prepared to slightly adjust the moisture level to get the right dough texture.
Baking Process & Troubleshooting
Yes, this bread can be baked in a Dutch oven with excellent results, similar to my Quick No Knead Rosemary Bread. Preheat your oven to 450°F with the Dutch oven inside. Once the dough is ready, place it in the hot Dutch oven and bake for 10 minutes with the lid on. Then reduce the oven temperature to 375°F and bake for an additional 20 minutes, still with the lid on. Finally, remove the lid and bake for another 8 minutes to allow the crust to brown.
This recipe includes three rise periods. First, the dough rises for about 1 hour, or until doubled in size. After deflating the dough, it rests for a second rise of about 30 minutes. Finally, once the dough is shaped and placed in pans, it rises a third time for 30 to 60 minutes, depending on the temperature of your kitchen.
Problems with rising are often caused by environmental factors like humidity, temperature, or flour moisture levels. The dough should be soft and slightly tacky but still easy to knead. If it's too dry or stiff, the bread may not rise well. Add flour gradually, and adjust water if needed to get a supple dough texture. Don't be afraid to trust the feel of the dough.
Ingredient Information
Both are 100% whole wheat flours, but they come from different types of wheat. Traditional whole wheat flour is milled from red wheat, giving it a darker color and heartier flavor. White whole wheat flour is milled from white spring wheat, which results in a lighter color and a milder, slightly sweeter flavor.
You can use regular whole wheat flour, white whole wheat flour, bread flour, or stone-ground whole wheat flour. Each variety brings its own texture and flavor. Personally, I prefer stone-ground whole wheat for its nutty, slightly rustic character, but any of these options will produce a delicious loaf.
More Bread Recipes You'll Love

If you try this recipe, I'd love to hear your comments and consider giving it a 5-star rating. Explore the recipe index for more easy, delicious ideas, and stay updated by subscribing to our newsletter and following us on Facebook, Pinterest, Instagram, and YouTube!
Want to save this recipe?
Enter your email, and we'll send it to your inbox. Plus, you'll get delicious new recipes from us every Friday!

Whole Wheat Bread Recipe
Equipment
- 2 9 x 5 inch Loaf Pans
Ingredients
- 5 ½ to 6 cups whole wheat flour
- 2 ½ cups warm water
- 1 ½ tablespoons instant yeast or 2 packages active dry yeast
- ¼ cup honey
- 2 tablespoons oil
- 1 tablespoon salt
Instructions
- In a large bowl or the bowl of your stand mixer, add warm water and honey. Sprinkle the active dry yeast over the top and let sit for 5 minutes. If using instant yeast, add it with the flour and skip the 5 minute proofing timenm.
- Add 4 cups of flour, oil, and salt to the yeast mixture; stir until incorporated. Then add the remaining flour, ½ cup at a time, until the dough begins to pull away from the sides of the bowl.
Knead the dough
- If kneading by hand, transfer the bread dough to a very lightly floured surface, oil your hands, and knead for 6 to 7 minutes or until the dough is smooth. If kneading in a stand mixer, using the dough hook, knead for 4 minutes at medium speed until the dough is smooth. Adjust the dough as needed with additional flour or water if necessary.
- Transfer the dough to an oil-coated bowl and let rise in a warm place for about 1 hour, until the dough has doubled. Punch the dough down, cover, and let rise for 30 minutes.
Shape the loaves
- Coat two loaf pans (8.5 x 4.5 inches or 9 x 5 inches) and set them aside. Divide the dough in half and form it into 2 loaves. I like to make a log and then tightly pinch the seam and the ends. Place seam side down in prepared pans, cover loosely, and let rise in a warm place until the center of the loaf has crowned, about 1-inch above the loaf rim-about 30 to 60 minutes.
Baking
- Meanwhile, preheat the oven to 350 degrees F.
- Uncover the loaves and place them in the oven. Bake for 35 to 40 minutes or until a digital thermometer reaches between 180° - 200°F. Tent a sheet of foil over the loaves after 20 minutes to prevent over-browning if desired.
- Remove the bread from the oven and from the loaf pans. Transfer to a rack to cool completely before slicing. Brush melted butter over the warm bread for a delicious crust as it cools.
Video
Notes
- Whole Wheat Flour: Regular whole wheat, whole wheat bread flour, white whole wheat flour all work great. I always use Stone Ground Whole Wheat Flour. Adjust the flour amount as necessary so that it pulls away from the bowl and is easily handled.
- Storing: Wrap bread and store it at room temperature for several days or freeze it for longer storage.
- Mixing the dough: This recipe is written for a stand mixer but can be made by hand. Knead until the dough is smooth, elastic, and slightly tacky.
- Dough rising: Rise times may vary depending on your kitchen temperature. Warmer environments will shorten rise times; cooler temperatures may lengthen them.
- Serving ideas: Delicious with butter and jam (like this easy strawberry jam recipe), sliced for sandwiches, or toasted for breakfast.
Nutritional information is only an estimate. The accuracy of the nutritional information for any recipe on this site is not guaranteed.
Made one loaf and some buns. First time ever using whole wheat. It was fantastic!!
Hi Shannon! Such a great idea for making one loaf and buns-- thank you for sharing and for trying this recipe. I'm so glad you enjoyed it!
I tried the recipe exactly as written and I could NOT get my dough to rise above the top of the loaf pan, let alone rise above it. I used 9x5 pans like the instructions indicated.
My dough was extremely sticky so my only thought is that I didn’t add enough flour, but my dough did look shiny and released from the bowl like the directions stated.
Hi Steve, I'm so sorry your bread didn't rise. Whole wheat flour contains much less gluten than all-purpose or bread flour so it requires a little extra kneading for the gluten to develop, which lets it rise. The dough should be moist but not overly sticky. You will usually need to adjust the flour and or water to get the dough just right.
When testing for the right amount of gluten there are two ways you can do this. One is the "poke test." Lightly poke the surface of the risen dough and see if an indentation has been left. If it bounces back and feels tight, it needs more time to rise. If it deflantes and indents too much, it could be overproofed.
The second test I always do when kneading the bread is called a "window test." To do this, stretch a small piece of dough between your fingers. The dough should stick together and appear mostly transparent. If it cracks, the gluten threads require more kneading.
Hope this helps!
I wish thst my Whole wheat bread would have a nice darker brown colour ad yours on the photo.I baked thd the 3rd time,and followed the recipe promptly,but very pale colour.Tastes amazing,but its not as pretty brown as on the picture.J use Whole Wheat flour.I brush them as they are cooling with som butter,which helps a very lit in the color.Please,help! Thank you!
Hi Ilona, I'm so happy you enjoyed this recipe! I'm not exactly sure why your bread wasn't as dark as you wanted it to be.
The color of wheat flour is often due to its wheat bran content, which can vary by brands, and also which particular wheat was used in its milling (hard red wheat, etc).
I almost always use a stone ground wheat flour with brands ranging from Bob's Red Mill to Stone-Buhr to a locally milled flour from Cairnsprings Mill. You can also brush a bit of olive oil (or cooking oil of choice) over the cooling bread to give it a bit of shine. I'm so glad you enjoyed the flavor though!
You could always add a little bit of cocoa to it, maybe half a tablespoon.
The very first time I made this recipe, it turned out perfect! Ever since then I cannot get it to rise a 3rd time in the pan. It rises perfectly the first 2 times, just not the 3rd. I've tried everything I can think of, but it will not rise up over the edge of the pan like it did the first time. I'm not sure what I'm doing wrong. I'll admit, I'm just an amateur, but I've been baking since I was a kid so I know the basics of making bread. I just can't figure this one out.
Hi Rixa-- that can be so frustrating! I'm so sorry. There is a point where fermenting yeast in dough will reach its maximum volume and then, even reverse. You definitely don't want that to happen. It's important to watch the dough, let it rise just until double, then proceed with baking. The next time I make the bread, I might let the dough rise once in the bowl, then gently deflate and shape into loaves and let it rise in the loaf pans for the second and final time, skipping the middle rising. See if that works for you-- I'd love to hear!
Im making them today 😍
Hi Eury! Hope you like them!
My previous comment should say ** after dividing the dough and before the final rise....
After dividing the dough and outdoor to the final rise, can half the dough be refrigerated and do the final rise in baking pan and baked at a later date?
Hi Irma, thanks for a great question. Technically, you are supposed to be able to do this. However, I have not tested that with this recipe. I plan to bake some later this week, and will test it then. I usually bake both loaves, and then freeze one. If you try it, I would love to hear how it goes.
What adjustments for the ingredients should i make if I have a small bread maker at home? I would love to try this at home! (:
Hi Fahranse! Do you know what size loaf your bread machine can make? This is usually in pounds, like 1.5 lb or 2 lb or how many cups of flour it can hold. That will help me make adjustments to the recipe.
What measurements do you use when using the freshly ground flour you mentioned?
Hi Susanna— I generally use the same measurement for both freshly milled and ready milled flour.
I have a dumb question- if I want to make just one loaf (it’s just my husband and I) would I just cut the recipe in half and use one bread tin?
Thank you!
Hi Julia— that’s a great question! Yes, you can half the ingredients and bake it in one loaf pan. But you might want to consider baking both loaves and freezing one for a homemade loaf later!
Can you use avocado oil or canola oil for the 2 tablespoons of cooking oil.
How much of the 120 total fat is saturated fat.
Also the 1.9g trans fat in the nutritional information is that the oil or something else.
Hi Karen, you can definitely use avocado or canola oil. Using olive oil, avocado or canola oil, saturated fat is 0%. Trans fat is also 0%. I've just rerun the calculations so the nutritional information should be correct as listed.
This is the same chris with the "do i cover it" question & I always want to know when people actually try my recipes, so I thought I'd show you the same respect: this bread is (and I'm not being hyperbolic here) PERFECT! I'm a 20+yr professional chef that like all proper chefs treated the pastry side like it was black magic. A realm best left to the wizards and pastry graduates of hogwarts. I've only just in the last 4 months started really dipping my proverbial toes into the baking waters. This is the VERY FIRST true loaf of bread I've ever made, and I wish I could show you...it came out FLAWLESS. I swapped the honey for molasses, because I just prefer it as a sweetener, but otherwise followed the recipe as written. 10/10 wouldn't change a thing (aside from the honey to molasses lol) I made some EPIC stuffed French toast this morning with it too. Thank you so much for sharing!
Hi Chris, you have made my day! Thank you so much for coming back and letting me know how the whole wheat bread worked for you. I wish you could upload a photo too! I'm actually working on that to see if there is anyway it could be implemented on the site. For me, bread making is such a thrilling and satisfying thing. I love it when people discover how really simple and fun it can be! I'm noticing lately that many are reaching for molasses as their natural sweetener of choice. That's a GREAT tip for everyone. Again, thank you so much for trying the bread and getting back to me on how it worked! And French Toast? I'm drooling!
i dont see anywhere where it clearly says to cover while rising...i see one mention of uncovering. so am i supposed to use plastic wrap? damp flour sack towel? leav it uncovered?
Hi Chris, yes, do cover the bread while rising. I like to loosely cover with plastic so there is room for rising.
Can I make cinnamon raisin bread it’s this recipe?
Hi Pauline, that's a great question. I've not tried it using this recipe. I've had on my list for a while to do a Cinnamon Raisin Whole Wheat bread recipe. Hope to do it soon!
Hi, I’m wondering about the nutritional info… 1.5 teaspoons salt per loaf…yet you’ve listed 0mg sodium/serving.
That's a great question because when you look at how the recipe card displays the nutritional information, it does look like that. The 0mg measurement is actually referencing the cholesterol. Sodium is 269mg. It comes after the colon :.
There are ZERO measurements of ingredients. This is useless. Ugh!
All the ingredient measurements are in the recipe card at the bottom of the post
The recipe does give the measurements….if that’s what you are referring to.
Estan al final, todas las medidas
I was looking at the nutrition facts. Are there really 91g of carbs per serving!?!!
Hi Amanda! Thank you so much for calling that out. I can’t imagine what happened with that, other than I think the serving size adjusted to servings 2 (as in 2 loaves) instead of actual sliced servings. The nutritional information has been corrected and the actual carb number is 23.9g.
Hi! Are add ins welcomed without having to adjust any other ingredients? Like adding in different seeds? Could I just add that in with the flour before adding the wet ingredients?
Hi Savannah! You don’t need to alter the recipe at all to add small nuts or seeds. I like to add them after the first rise. Would love to hear how it turns out!
Hi! I came across ur page while searching for whole wheat bread tutorials and yours has the easiest and with least ingredients listed! So im curious i think i may try to do this one! Im a beginner at baking, actually i never tried it, and I'm thinking for practice i think one loaf would be great for now. What adjustments to the ingredients i should make if i opt for one loaf?
Hi Vona! I'm so glad you found us! This bread works great for beginning bread makers and I hope you enjoy it. You can easily cut the ingredients in half, of make 2 loaves and freeze one. I do that often, slicing the loaf after its cooled, and then I have slices ready whenever we need them!
Thank you for the directions. I’m newly retired and trying bread baking for the first time. I grew up on homemade bread and look forward to making it. I found a recipe in my mom’s church cookbook but it didn’t say when to knead! (I guess those ladies all just knew!) so glad I found your post. I’m trying molasses for the sweetener - I had it and thought it might be a richer flavor. The yeast LOVED it - bubbled right up. On my first rise now. ❤️
Hi Danae! I'm so happy you're trying this bread recipe! I also grew up on homemade bread and there is nothing quite like it. Hope you enjoyed it and thank you so much for trying it!