
How to Make Lattice Pie Crust
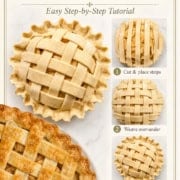

A lattice pie crust gives a homemade pie its classic woven finish, and it's much easier to make than it looks. Once you understand the simple over-and-under pattern, the process becomes surprisingly intuitive. This step-by-step tutorial shows exactly how I weave, trim, and flute a lattice top for fruit pies like my Apple Pie.
Perfect for topping my Classic Apple Pie or any fruit-filled dessert - and made with my All-Butter Pie Crust recipe for the flakiest results.

This post may contain affiliate links. Please read our disclosure policy.
Want to save this recipe?
Enter your email, and we'll send it to your inbox. Plus, you'll get delicious new recipes from us every Friday!
Pies are one of my favorite desserts to make, from shaped hand pies, like our apple hand pies, to open-faced pies and traditional pies with vented pastry tops. But my favorite from-scratch pie crust will always be this. I get a lot of questions about how to make a lattice pie crust, so I thought it would be helpful to gather all my favorite tips in one post!
While a lattice top pie looks pretty and even difficult, it's incredibly easy to make. And once you do, you'll be making them as often as possible!
Jump to:
What is Lattice Pie Crust?
A lattice pie crust is a woven top crust made by arranging strips of pie dough in an over-under basket-weave pattern. The open spaces allow steam to escape as the pie bakes, while creating the classic decorative finish often used on fruit pies.
What You'll Need
- Chilled double-crust pie dough (I love my all butter pie crust recipe.)
- Rolling pin
- Pastry wheel, pizza cutter, or sharp knife
- Small paring knife or kitchen shears
- Pastry brush and egg wash (1 egg + 1 tablespoon milk or cream)
- Optional: ruler for even strips
How to Lattice Pie Crust
Begin by rolling one disc of chilled pie dough into a 12-inch circle on a lightly floured surface. Then, follow these easy steps:

- Step 1: Cut the rolled dough into ½- to 1-inch-wide strips using a pastry wheel, pizza cutter, or sharp knife. I usually use about 10-12 strips; wider strips create a simpler, more rustic lattice, while narrower strips give you a more delicate look.

- Step 2: Arrange about half of the strips vertically over the filled pie, spacing them evenly. Place the longest strips across the center and shorter strips toward the edges.

- Step 3: Fold back every other vertical strip toward the top of the pie.

- Step 4: Lay one unused strip horizontally across the center of the pie, perpendicular to the vertical strips. Unfold the folded strips back over the horizontal strip.

- Step 5: Fold back the alternate vertical strips. Lay another horizontal strip beside the first, then unfold the vertical strips over it.

- Step 6: Continue working across the pie, alternating which vertical strips you fold back each time. The pattern is simply over, under, over, under.

- Step 7: Trim the excess dough, leaving enough overhang to seal the crust. Fold the edges toward the center of the pie, pressing the top and bottom crusts together. Crimp or flute the edge, then brush the lattice with egg wash and sprinkle with coarse sugar, if desired. Chill briefly before baking, then bake according to your pie recipe.
How to Crimp and Flute a Pie Crust Edge
- Fluting creates the traditional wavy edge using your fingers and knuckles.
- Crimping can be as simple as pressing the edge with the tines of a fork.
To Flute the Edges
Fold the overhanging dough under itself to create a smooth, even rim. Using your thumb and forefinger on one hand and the knuckle of your other hand, gently pinch the dough into small, wavy shapes all around the edge.
Tip: For best results, chill the fluted pie for 15-20 minutes before baking to help the shape hold during baking.
To Crimp the Edges
For a simpler, more traditional look, press the dough edge all around the pie plate with the tines of a fork, dipping them lightly in flour as needed to prevent sticking.
Both methods are classic, beautiful, and easy to master - and they add that final handmade touch to your pie.
Decorative Variations
- Braided Lattice: Braid three thin strips together before placing on the pie for a textured look.
- Wide Ribbon Lattice: Use fewer, wider strips for a rustic, dramatic design.
- Cut-Out Accents: Use leaf or star-shaped cutters to fill small gaps or decorate the edges.
Lattice Pie Crust FAQs
Keep the dough cold. If it softens or stretches, return the strips to the refrigerator for 5-10 minutes.
Yes! Arrange it on parchment paper, freeze flat, then transfer onto the filled pie when ready to bake.
It's optional but recommended - it gives your crust a beautiful golden sheen and helps the sugar adhere.
Anywhere between ½ inch and 1 inch works well. Narrower strips create a more delicate, intricate lattice; wider strips give a bold, farmhouse look.
Yes. Chilled refrigerated pie dough works well for lattice crusts. Let it soften just enough to roll or unfold without cracking, but keep it cool enough that the strips hold their shape.

How to Make a Lattice Pie Crust
Ingredients
- 1 disc chilled pie dough I'm using ½ of my all butter pie crust recipe
- all-purpose flour for work surface
- egg wash (1 beaten egg with 1 tablespoon milk or water)
- optional: coarse sugar for sprinkling over the crust before baking
Instructions
- Make dough in advance: Prepare the pie crust dough in advance and chill according to the recipe directions. You will need 1 chilled disc for the lattice top.
- Roll the dough: On a lightly floured surface, roll the chilled dough into an 11-inch circle.
- Cut the strips: Cut the dough into ½- to 1-inch-wide strips using a pastry wheel, pizza cutter, or sharp knife. I usually use about 10-12 strips; wider strips create a simpler, more rustic lattice, while narrower strips give a more delicate look.
- Arrange the vertical strips: Place about half of the strips vertically over the filled pie, spacing them evenly. Use the longest strips across the center and shorter strips toward the edges.
- Begin weaving: Fold back every other vertical strip toward the top of the pie. Lay one unused strip horizontally across the center of the pie, perpendicular to the vertical strips. Unfold the folded strips back over it.
- Continue the weave: Fold back the alternate vertical strips. Lay another horizontal strip beside the first, then unfold the vertical strips over it. Continue across the pie, alternating which strips you fold back each time. The pattern is simply over, under, over, under.
- Finish the crust: Trim the excess dough, leaving enough overhang to seal the crust. Fold the edges toward the center of the pie, pressing the top and bottom crusts together. Crimp or flute the edge, then brush the lattice with egg wash and sprinkle with coarse sugar, if desired.
- Chill: Refrigerate the assembled pie for 15-20 minutes before baking to help the lattice and fluted edges hold their shape. Bake according to your pie recipe.
Notes
- Recipe: Works with half of one All-Butter Pie Crust recipe.
- Chilling: Chill the assembled pie 15-20 minutes before baking for the best shape and texture.
- Egg wash: Brush with egg wash and sprinkle with sugar before baking for a golden finish.
- Pre-made crust: If using pre-made dough, let it soften slightly before cutting so it doesn't crack.
Nutritional information is only an estimate. The accuracy of the nutritional information for any recipe on this site is not guaranteed.
Easy Pie Recipes

If you try this recipe, I'd love to hear your comments and consider giving it a 5-star rating. Explore the recipe index for more easy, delicious ideas, and stay updated by subscribing to our newsletter and following us on Facebook, Pinterest, Instagram, and YouTube!
More Easy Pie Recipes



Popular Right Now




Love seasonal recipes and easy ideas for everyday cooking? Join 36,000+ readers and receive our newest recipes each week.
Subscribe to the Newsletter
There’s something extra special about a lattice pie! I love how easy they are to make and how it instantly elevates your favorite pie recipe.